
(The Hammer)

The official Transmission of the Klingon Imperial Weapons Guild.
9804.15____________________________________________Vol.2/No.4 Part Two

As the Guild grows, we will try to enhance camaraderie by publishing histories
of our members (both Klingon and Terran). It is not necessary to develop a
family history to be a Guild member, but it does help to solidify an image of
you as a fellow crafts person and Klin.
The Five Blades
With tired hands K'Daq finished polishing the
last of the five weapons of honor (a tajtIq) and placed it alongside the other
four - an 'algnegh, a QIS, a jeqqIj and a 'aqleH. It was as if a tremendous
weight was lifted from his aged shoulders. Five weapons , five warriors, five
friends - each as different as the east is from the west but together they made
a formidable unified force. It was this force that had sustained the ancient
Klingon for so long.
Years ago K'Daq had undergone the Rite of MajQa. The
vision of his father had told him that it was not his place to join the Black
Fleet - that in Sto-Vo-Kor he would be known for his blades. For all eternity he
would supply blades for the greatest warriors of the Empire.
It seemed
rather disappointing at first. The Black Fleet was every warrior's right, but
after a time K'Daq realized that his spirit lived through each blade he created.
He was actually able to experience the Black Fleet from the viewpoints of
thousands of warriors. So his inevitable passing on to eternity was now an event
he looked forward to.
The five warriors would be guardians of his spirit
until he made the final journey. after which the blades would be there to guide
them and to free them to fight with the strength of a dozen
warriors.
Kri'stak, mountain of legend, I will miss you.
Next
month: I warned you. Unless you want to be subjected to more *hazy* memories of
life on the volcano - Send in your bios !! If you've sent one in and I didn't
post it, its been lost ......so send it again. I am finally settled with the new
computer so losses should be a thing of the past........SHOULD be.

The jey'naS or Klingon Double Headed Battle Axe
Like its smaller
brother the 'alngegh, the jey'naS is an ancient weapon - axes, in general,
having given way to blades more adaptable to the developing Klingon fighting
style. However many a warrior can be found who still understands and prefers the
axe in combat.
The jey'naS is a more massive weapon than it's smaller
brother. The double heads and longer shaft make it roughly twice as heavy as the
'alngegh. Reaction time will be slower while fighting with this weapon and for
that reason the addition of the *offensive* pommel has been made to prevent any
disadvantages.
Warriors who choose the axe in combat tend to be more
steadfast in their demeanor. Although they don't appear to be as *graceful* as
the typical sword fighter, appearances can be deceiving. Axe fighters don't
hesitate to take the fight directly to their opponent - there is very little in
the way of feints. Since the same muscles are developed in making blades at the
forge, smiths tend to choose the axe because of it's comfortable
familiarity.
Qa'Pla!!!
mupwI' yI'uchtaH !!

jey'naS - Klingon Double Headed Battle Axe
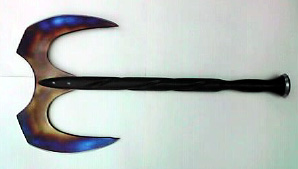
jey'naS Dimensions -
average:
Blade material -- G-2 titanium
thickness of blade -- .25
inches
length of blade -- 11 .50 inches.
width of blade -- 15.5
inches
Handle/ material -- 28 inch X1.5 inch dymondwood
shaft
Pommel -- 3 inch X 5/8th inch beveled titanium disc
Total
length -- 30.5 inches
weight -- 2.75 pounds
Next month : Mevak - Ceremonial Mauk To'Vor Dagger

bat'leth/SOK - Grinding to the final pattern, beveling and
polishing
This month we move along to *cleaning up* your rough cut
pattern, polishing the body of the weapon and placing cutting
bevels.
K'Beck touched on the initial grinding to pattern lines last
month but we'll expound on it a bit this month as well. No matter what method
you use to cut your pattern out, you will invariably be outside of your intended
pattern. Many times I draw up a pattern and when it is initially cut out I find
that I'd like to alter the blades arc or deepen one of the cut-outs - either for
esthetics or functional reasons. For this reason cleaning -up is a constant
order of business.
Options
The cheapest and most time intensive method would
involve the old hand file system. This might sound insane, but it is a time
tested method and can come in handy when you are short on cash for machines. If
using this method make sure your files are sharp and that your work piece is
securely fastened down to a bench surface. If the metal is even the least bit
loose, you will lose some of the files cutting ability. It is also important to
remember that most files cut on the push stroke. Dragging the tool back over the
edge only promotes damage to the teeth. It is important to gain confidence with
this technique because it will be used in many instances when power tools can't
gain access to a work area.
The next option is both reasonable in cost
and quite efficient - the bench mounted grinder. You can get a small bench
grinder for around $50 at most large hardware chains and if you check around you
can probably find one cheaper in the want ads. These use abrasives in a hard
wheel. They come in standard coarse/medium/fine grits and last through quite a
few blades. I use the coarse stone to clean to my pattern lines because it saves
expensive belts and I can get into tighter spaces with the wheels. A standard
wheel for a 6 inch grinder runs about $7.00 while a standard abrasive belt costs
about $4.50. One wheel will clean up many patterns and one belt will wear out
long before it cleans up one pattern. So the math leans you toward the grinding
wheel. You can also buy a *chuck* for the grinder and use it to mount grinding
*bits*, sandpaper drums/disks and abrasive shapes for refining your
work.
The last option is the belt grinder. If your pattern is fairly
close to the lines and you are anxious to get going you can grind to your lines
and start beveling at the same time. This is a more advanced technique since it
will make it hard to locate the blade's center line later. If your eye is
trained you can keep tabs on the center line while doing this. Otherwise it
procedes just like the grinding wheel
When cleaning to your pattern lines
it is a good idea to run your blade perpendicular to the grinding surface so
that you keep the edge square. If you hold the blade parallel to the wheel or
belt or file you might not be able to see the edge alignment and in doing so
grind past your pattern lines.......so keep an eye on how *square* your edges
are.
Because the bat'leth and the Sword of Kahless both have cut-outs
you will need to develope a technique to clean these interior areas as well. For
the file users there is no difference. For those using the grinding wheel you
can sometimes work it into the interior but it can be dangerous if the piece
*binds*. The belt grinder is almost worthless on interior areas unless you have
a very small wheel attachment and a long belt. These are found on the expensive
grinding machines.
A useful tool to work interiors is a drum sander
mounted in a drill. You can also put it in a drill press or use a table mounted
drum sander. In each of these cases you either clamp the metal down and bring
the drum to it or secure the drum and move the piece around. These give you a
clean and square edge on interiors as long as the drum fits into the cut-out.
You can get a variety of diameters of drums so this should cover almost every
situation. You can also buy stones mounted on shafts that fit in drills and
drill presses as well as *die grinders*. These act like the bench mounted
grinder only slower, but they get into restricted spaces.
Once your
pattern is where you want it I would suggest you polish the body of the blade
before doing any bevel work. This is for two reasons.
1. It squares the
edges and gives you a more accurate bevel placement.
2. It prevents
grinding into your bevel area when you are doing the *bulk* work.
Once
again you have a variety of options. Basically sandpaper is sandpaper whether it
is on a machine or in your hand. If you are using your hand be sure to put the
paper on a block to keep it square to the metal.....then just be patient and
work through the various grits. Which grit you start with depends on how rough
your metal's surface is to start with. If its pitted you'll need to start with a
50, 60 or 80 grit. Once you have the initial uniform surface created then its
only a matter of moving up the grits to the point at which you are satisfied (or
worn out). I usually polish to a 400 grit and then drop back to a 200 grit paste
on a buffing wheel to remove any grinding marks.
The machines available
for this operation are the various sanding machines. Palm sander, orbital
sanders, belt sanders etc. The palm and random orbital sanders usually make a
cleaner path without any *ditching*. The belt sander can remove material the
fastest but if used improperly it will trench your metal quickly. The important
things to remember about belt sanders is to keep them moving. Making even sweeps
of your blade in the same directions until the entire surface is gone over -
then repeat.
The table mounted belt grinder gives you the added stability
of getting to move the metal on the belt but it can also leave trenches if not
used properly.
Beveling
We've covered the process of beveling before and you
can refer back to the supplimentary article on that in the previous *mupwI'* by
using this link.
Bevels
I'd
like to stress another aspect of the bevels at this time and that is the design
and layout of the bevels themselves. Not all swords have cutting edges in the
same places. If you plan on moving your hands around on the blade during use,
you'd better not bevel too many surfaces. If you are happy to use the hand holds
then you can sharpen almost every edge on the weapon.
Recently K'Beck was
given instructions by local leaders in KAG to *dull* the edges of his weapons
due to an incident at a convention. You need to make sure you are aware of any
details concerning weapons at the convention you are attending before you find
your blade back in your car or confiscated by a con organizer. It might be your
proudest piece of work but it is a weapon and not everyone can be trusted with
sharp things at some events. Because of this, many events will exclude all
weapons so as not to offend anyone in particular.
At my first convention
I had made meqleths for both myself and my nine year old son but Texas A&M
didn't allow any type of weapon - even plastic toy guns. So all of that hard
work went for naught.
In general the bat'leth and Sword of Kahless have
sections of the edges used for blocking attacks and sections for making cuts.
The junction of two edges is usually left thick and acts as a blade *catcher*.
In many of Worf's fights he breaks the opponents weapon with this section of his
blade. I'm not sure that speaks too well for his opponent's blade
construction.

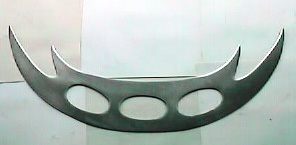
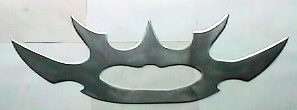
The Standard bat'leth and the Sword of Kahless
Patterns cleaned up/body polished/bevels placed
These are
terrible pictures. The weather out here has made photography difficult. As soon
as I get acceptable results I will update this section and notify you
all.
What you are looking at (if you could see it) are both weapons
polished and beveled.
Next month we will discuss handle options and
complete the weapons.
.
.
If
you'd like to get a head start on next month's work find some nice hard-wood or
large slabs of animal horn (if available). You can also use a wooden spacer and
wrap it with leather to give yourself a more comfortable grip while still
looking like the weapons on the shows.
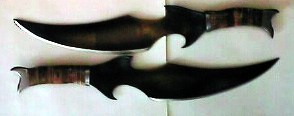
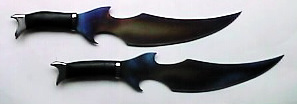
Bonus Weapons
To make up for the lousy photos I'm including the
finished tajtIq pair from *Apocalypse Rising*. With the blued blade and black
leather handles offset by the heavy titanium hardware - well.....I was a happy
old Klingon. Enjoy.
These are the blades with
their leather shaped prior to treatment with the lacquer.
.
.
I
used black lacquer to soak the leather this time. I liked the results.
mupwI' yI'uchtaH !!
*mupwI'* Volume 2/ Number 4/ Part One