
(The Hammer)

The official Transmission of the Klingon Imperial Weapons Guild.
9803.15____________________________________________Vol.2/No.3 Part Two

As the Guild grows, we will try to enhance camaraderie by publishing histories
of our members (both Klingon and Terran). It is not necessary to develop a
family history to be a Guild member, but it does help to solidify an image of
you as a fellow crafts person and Klin.
House Subaiesh
This month's history is to honor our Guild member
VisTar.
House Subaiesh is a Major Family Line in the Klingon Empire. The
Subaiesh have been attempting to make changes within the Empire for the last
decade. By pursuading the Klingon Fusion Houses to form an Alliance for the good
of all, they have managed to secure a fair degree of political power within the
Empire.
The Subaiesh are leading a growing movement for improved
relations with the Federation, which most Imperial Family lines have vehemently
opposed, despite the initiation of the formation of a *Grand Alliance* with the
United Federation of Planets. Having survived the initial political backlash of
their peace efforts, the Subaiesh are determined to place as many of their line
members as possible in the Klingon Imperial Diplomatic Corps, whatever it costs.
From a strong position there, the line hopes to gain sufficient clout to put
their plan into operation.
House Subaiesh is a member of the Kasara
Family Alliance; which is a formal alliance through treaties and consortships of
over a half dozen influential family lines in the Empire. These family lines are
pro-Federation and pro-Grand Alliance and use their powerful influences in many
aspects of the Klingon Empire to follow through on thier plans.
House
Subaiesh is an extended family line composed of 65% Klingon/Human Fusions and
35% Klingon/Romulan Fusions. There are approximately 22,000 members of the
Subaiesh line throughout the Empire who follow Admiral Kemarrin epetai Subaiesh
as their current House Leader. There are estimated to be several dozen Subaiesh
presently located on Terra. House Subaiesh members can be identified by two
parallel scars two centimeters long somewhere on the line member's person. The
current Terran Head of the House is the Chancellor Stalker zantai Subaiesh of
the KIDC.
Next month: Send in your bios or be forced to read the hazy
recollections of a drooling 163 year old Klingon weaponsmith. If you've sent one
in and I didn't post it, its been lost ......so send it again. I am finally
settled with the new computer so losses should be a thing of the
past........SHOULD be.

The tajtIq or Klingon Shortsword
The tajtIq like the 'algnegh and
the ghIntaq dates to a more ancient time in Klingon history. It falls into the
vast array of weapons utilized by Klingon warriors prior to the development of
the standard fighting style brought about by the Mok'bara.
The tajtIq can
be defined as either a short sword or a long knife(Okrand states that it is "a
knife with a particularly long blade that is used almost as if it were a
sword."), but in either case it lends itself to more *intimate* combat
situations. The ancient Klingon's who favored the tajtIq were known for their
rapid hand movements and not for their shear strength and size. The size and
balance of this weapon allows it's user to deliver multiple strikes before the
enemy can react and defend.
As the Klingons embraced the Mok'bara the
need for such specialized weapons waned, but it is still not uncommon to see a
warrior wielding a pair of these savage blades.
Qa'Pla!!!
mupwI'
yI'uchtaH !!

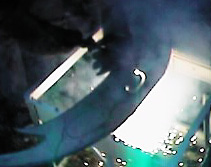
tajtIq - Klingon shortsword
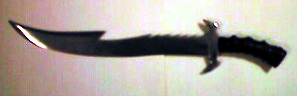
A much
better picture will be posted as soon as the pommel is placed. This one really
does not do the weapon justice.
tajtIq Dimensions - average:
Blade
material -- 440C stainless steel
thickness of blade -- .25
inches
length of blade -- 20.00 inches.
width of blade -- 2.5
inches
Handle material -- 6.5 inch antelope horn with sterling
pommel
Total length -- 26.5 inches
weight -- 1.5 pounds
Next month : jey'naS or Double bladed Battle Axe

Cutting methods for knife projects
This month the tips section
will deal with how to get your piece of material cut into it's rough shape. As I
have mentioned before there are basically three ways to do this: 1. Bandsaw, 2.
Cutting torch and 3. *Cold - chisel* .
The first two methods are very
self explanatory and in some cases cost prohibitive.
Number one - the
band saw. Bandsaws that can cut out thick steel (particularly stainless) are
generally expensive and not practical unless you plan on making a great many
knives. Large projects are quite difficult to handle on most saws except the
ones with very large tables and these are the most expensive. A bandsaw makes a
very clean cut and saves much grinding time, but it can't make the tight curves
seen in many of the Klingon weapons we deal with. I opted for a *cut-off* saw
which is a small contractors tool normally used to cut *re-bar* and construction
steel. I modified the table to allow for vertical work and to hold larger items.
I also bought special alloyed blades to handle stainless, but I still have to
improvise to get the *detail* work cut out.
Number 2 - Cutting torches.
These can take many forms - from standard oxy/acetylene to the plasma cutters we
have all drooled about. There are also laser cutters and *water cutters* that I
have heard tales about but have no actual knowledge of (however I have a
distinct impression that those are very expensive). These devices provide a
means of cutting large projects out with a minimum of physical effort - however
they do not provide a clean cut and room must be allowed to maintain your
pattern lines. The *slag* produced by the torch increases your working time in
clean-up, but a great deal of progress can be made on the areas with tight
curves. You need a steady hand for this process.
Number 3
- Using hand tools. The following section is here thanks to the hard work of
K'Beck. This advice and methodology can be of great help to those of you who
want to get started but can't justify expensive machinery.
For the
Machine Impaired: By K'Beck
For those of us who don't have the space or
money to buy every piece of equipment that we really want or need, there will
always be a few techniques that will help achieve our goal in spite of our
handicap. I hope to present a few of them here whenever I can, so here goes the
first one. Cutting steel can be a challenge. If you buy steel in bar form and
shape it into a straight knife you can use a hack saw or simply grind down to
your pattern , but when you need to do a piece that is a little more
challenging, such as the bat'leth or the cut outs on the dk'tag you need to get
a little more aggressive. The method I will demonstrate is only one way that you
may accomplish your task.
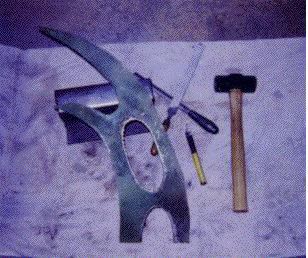
The Cold Chisel Method;
You will need
the following tools:
1.An anvil,These can get expensive! they can range
from 25 lb on up to 200 lb or more. I don't have one, for a long time I used the
flat section on my 6" vice , now I have a 8" section of rail road track. I got
mine from a SCA member. I have seen an article that showed a Tialand fellow
using what looked like a 6" X 6" hunk of steel buried in the ground, you just
have to do some checking around to see what you can find. the heavier the
better!
2.A hammer - again the heavier the better, I found out the hard
way that I wouldn't go over the 4lb range. I was using a 7lb sledge and couldn't
control it very well (I hit my hand far too many times). A claw hammer will work
, but its a little too light.
3.A cold chisel , they aren't very
expensive and a good one will last longer. I use a 1/2 inch wide one.
4.A
drill and drill bit , a drill press is nice but a hand held one is faster to use
on larger pieces . I like to use a 1/4 inch drill bit, I kept breaking 3/16th
ones.
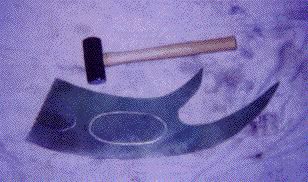
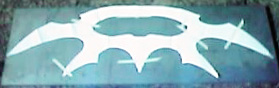
Now on to the project, I am cutting out a bat'leth from 3/16
stainless steel plate. I am forced to cut it out in two halves then I plan on
welding them together , I wasn't able to get a piece of steel wide enough. I had
already cut out the basic shape when K'Daq suggested that I write this. So we
get to start as I cut out the holes for the handles .
.
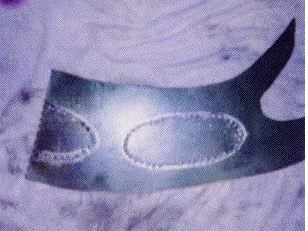
Your
eyes do not deceive you ,I painted the thing green so you could see where I had
everything marked better . The first step is to drill holes all around the
perimeter of the cut. Be very careful not to let the drill "wander" outside of
the layout line, and leave yourself room to slip up a bit. It is far easier to
remove metal than it is to put it back on! When you are drilling your worst
enemy is heat. Keep your drill bit cool. I use the oil that I have drained from
my car the last time I did my oil change (OK the last time my wife did the oil
change) Water will work but it evaporates far too fast and it doesn't stay like
oil. I set the whole piece on a table that I put together so that I can drill
all the way through and into the table top without worrying about it, other wise
set it on blocks or scrap wood. If you are working on a smaller piece clamp it
down so it doesn't spin when the drill bit cuts through.
I will throw in my
two cents worth here on shop safety.My grandfather told me if you have something
you like ,protect it! Safety glasses are a must! Gloves are suggested when they
do not interfere with anything you are using (i.e.. small things that you can
not hold on to with gloves) I wear fingerless gloves most of the time. If
something metal falls, don't try to catch it. Just get out of the way. The
bat'Leth caught on my shirt tail once and I grabbed it out of habit and received
a nasty cut on my palm from a bur on the edge.
After you have all the holes
drilled it's time to go to the anvil.
.
Start
your cuts as near to the outer edge of the holes as you can , it will leave less
material to remove later. I don't try to cut all the way through from one side,
I leave a little so that I can flip it over and finish out the cut from the
opposite side. That way I don't let the cutting edge of the chisel hit the
surface of the anvil, it would be bad for both tools.
Now if everything is
done right all you should have to do is knock out the cut out, sounds simple
huh? I use the edge of my anvil so that it and the hammer act like a set of
scissors to shear the small portion of metal that's left between the cuts,
otherwise you may bend your blade trying to force the whole thing out at one
time. Once it starts separating it goes fast.
.
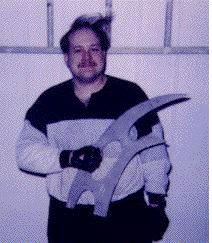
Once
you have your cut made grind or file those edges down to the finished size, step
outside into the wind and let your wife or significant other take your picture.
.

The Standard bat'leth and the Sword of Kahless
Selecting material, creating a pattern, layout and rough
cuts.
This month we start a double project that the majority of you
have quietly waited for. With patience and the continued advice from members
such as K'Beck's above you can see your dreams realized.
Enough talk !
Lets wade into this.
1. Materials - We are not Ferrengi nor Pakled but
materials must be acquired and at a reasonable cost. Lets put my *perfectionist
twinge* aside for a moment and talk sense. At this stage you need to examine the
reasons you wish to have a weapon of this nature. Do you crave realism ? Is it
the actual owning of a technically accurate weapon that drives you ? If the
answers to these questions are yes then you have taken the expensive (and
*heavier*) road. This road is much more difficult to travel but it can be
traversed if you take your time and keep your eyes open. In order to keep costs
down you must become familiar with local scrap yards or get friendly with a
local machine shop. It is always possible to *luck into* a situation where the
perfect scrap of metal becomes available for your needs. If not you need to
resign yourself to paying the extra to satisfy your goals.
If you are
like the majority of Klingon fans, then stark realism is not essential and
allowances can be made in material selection. Face reality for a moment -
Klingons are massive beings capable of using weapons that a typical human could
only dream of lifting in a fight. If you are a human and aspire to carry such a
weapon to a convention, you need to make the modifications to your blade that
will allow you to comfortably assume your place in Klingon society. Reducing the
weight can only be accomplished by making a smaller weapon (usually
unacceptable), using lighter material, or using thinner material.
Lighter
materials typically used are aluminum, plexiglass, wood and most recently
titanium. Aluminum is commonly seen, easy to work with and durable but lacks the
cold hard appearance of steel. Wood is very easy to work with and an excellent
practice material for beginning craftsmen. With the new sealers and paint
options available a respectable sword can be produced. Plastics are also subject
to the downside of paints and also have a higher price and lower durability
factor. We all know the downside to titanium - cost - but it gives you the
ability to have a technically accurate sword that a human can handle without the
questionable appearance of wood, plastic or aluminum.
Another common
method to reduce weight is to use 1/8th plate as a blade material. This would
quickly cut the weight of a typical *Kri'stak* weapon in half. I do not want my
words to be interpreted as critisism of craftsmen producing these blades - a
1/8th blade thickness is an honorable weapon for convention or public appearance
use. They photograph well, are a thing of beauty to be seen swung in glorious
arcs and when crafted by a skilled artisan they make a most worthy
weapon.
Finally much has been said or inferred about stainless versus
carbon steel. Carbon steel should not be scorned. In fact I would say that a
Klingon would be more likely to own a carbon steel blade than a stainless steel
one. Carbon steel is the steel of the forge and stainless is a development of
modern Terra. The only importance to you (the soon to be owners) is that carbon
steel requires more upkeep since it rusts more readily (yes lower grades of
stainless DO rust). The area of concern for you is whether the steel can be heat
treated to a edge holding hardness. If you aren't planning on hardening your
blade than it doesn't really matter what steel you make it out of - in this case
go straight to your local supplier of construction grade steel.
This is
the Imperial Weapons Guild and we are here to learn about quality edged
weaponry, so we will concentrate on weapons quality metals from here on. This is
not to be taken as a put-down to our members (or anybody else) working in other
materials. If God has put you in a position to create then do so and revel in
this honor as long as you have the strength. One day I hope you all will be
holding a sword made with your own two hands. I hope I and the members of the
Guild can help you realize this quest.
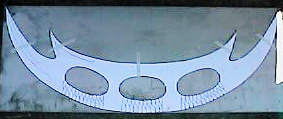
Patterns
The Standard
bat'leth pattern can be acquired by visiting the December *mupwI'* and printing
the line drawing. Take this to your local copying center and have it enlarged
until the distance from tip to tip is 1 meter (as described in the Trek
Encyclopedia and as referenced by Worf in TNG). As for the Sword of Kahless,
there are a number of flat plan images of it now in a number of Trek reference
books.....or you can print the image of the Titanium SOK now posted in this
issue and enlarge it to a width of 43 inches.
Remember this is a massive
Galactic Empire. Alter the pattern to your liking. If you want longer blades
then make them so. If you want bigger secondary blades then make them that way.
Do not fall into the *pit* created by fandom that says "a bat'leth looks exactly
like this". There are a number of patterns available around the net, and in Trek
reference books. The one posted here is only my preference and the size is one
specified by Worf and the Trek Encyclopedia - but who is to say that you can't
have one twice as wide ? Surely not I. If you need a Terran example of this
concept I give you two the *Bowie Knife* and the *Katana*. I challenge you to
find a definition that locks these weapons into a *mold*.
.
.
If you
are cutting these patterns with a torch you need to transfer the image with a
hard chalk marker or the heat will burn off your line. Using any other method
only requires that you make an accurate transfer (you can even tack the pattern
directly to your material and cut to it as I did on the QIS
project).
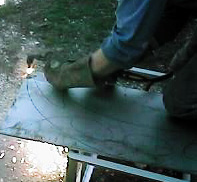
Rough Cuts
For these projects we will be using two of
the methods outlined above. K'Beck has already given you an excellent course on
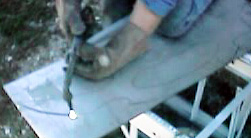
using the cold-chisel. I will be using the oxy/acetylene torch. The process is
self explanatory and the pictures included are only for your entertainment. Look
closely and see if you can pick up the images of hot sparks burning into K'Daq's
skin.
.
.
Now you
have finished a major step. Have some ale! Howl out your back door! Gather your
files or grinders as we move to the next step in which we clean the cuts to the
pattern line and lay out the bevels. Thats the topic for next month. Perhaps we
can get some more insight from K'Beck.... or from some of our new members who
have traveled this path. Good luck, write me with any and all questions
and........
mupwI' yI'uchtaH !!
*mupwI'* Volume 2/ Number 3/ Part One