

I have been getting reports on the new *Star Trek: The Experience* in Las
Vegas. If any of you have the opportunity to partake of this I am sure the rest
of the Guild would like to read a nice article on it. mupwI' yI'uchtaH !! (Keep holding the hammer ! )
STRENGTH, SIMPLICITY, POWER and
DANGER
I hope you enjoy it. As always your comments and input are
welcome.
K'Daq son of
Toragh
Master of the Heart of Kri'stak

QaPla!
I have just returned from my shop, I was trying an experiment
that was suggested by a friend of mine who is an authorized SCA armorer.He uses
a time honored method of cutting all his metal,the hammer and chisel method! Now
I have used this method to cut a d'k tahg out of 1/8th inch carbon steel and it
worked wonders on the cut out potion of the blade,I am planning on cutting out a
batleth out of 3/16 stainless sheet metal next.Now here it gets a little tricky.
I tried cutting that 1/4 inch mystery metal that I made the Meqleth out of, and
only succeeded in banging up my hand . I was using a 1/2 inch wide cold chisel
with a slightly sharper than normal bevel. The cutting edge of the chisel held
up remarkably well! I was using a 7 lb. sledge hammer with the handle cut down
to a more usable length. I was hoping to report a method that would help you in
your current dilemma, but I wouldn't suggest it to anyone who is not accustom to
some physical abuse on a regular basis! Nor would it be useful on anything
thicker than 3/16. I may be going over some old ground for you, but it was
soothing new to me ,so I thought I would share it with you.Is titanium more
shock resistant than steel ?
K'Beck
Honored friend,
I
really liked this letter. It shows the *driven* nature of the craftsman. I can
recall a number of times when the tools at hand didn't do the job so I had to
improvise. I have known a number of SCA armorers (I still consider myself to be
one) and they tend to try the more ancient methods more often than you'd think.
Its all a part of *existing* in the medieval times. OUCH though ! My arms hurt
thinking of pounding a 7 lb. sledge against unyielding metal. I was so
determined to cut out my first *Conan the Barbarian Sword* that after I had
broken all of my bandsaw blades I switched to a hack saw and then finished with
a Dremel tool and *separating* wheels. To say I was obsessed with getting that
thing cut out would be a gross understatement.
On a serious note, this is
a good option for the *machine impaired* members who have smaller gauge steel in
their projects. As long as the steel is dead soft, this method can produce good
results. It will build your arms as well
I'm wondering if your
mystery metal has been heat treated ? Perhaps its just average steel but
hardened ? Could you anneal it and try it again ?
Great news on the
titanium front. I got three new blades over the holidays and the new ones cut
the titanium about the same as steel. I am getting a feel for the stuff. It's
major *quirk* arises when it is subjected to heat. For example if you try to
drill a hole in it with a high speed drill the drill overheats and the metal
doesn't cut. It responds much better to very slow blade and drill speeds. With
my drill press set on its slowest revolution I went through the quarter inch
stock with a quarter inch drill for the rivet holes with no problems at all. I
think this quality is what led to stripping the teeth off of the last two
bandsaw blades. I have now developed a very easy feed technique on low speed and
the blades last and the metal cuts. Finally, as I mentioned in an earlier
letter, you can always cut it with a torch and on the future large projects that
is exactly what I will be doing.
Excellent letter. As always , thanks for
your input - it always elicits good discussion.
K'Daq
Great and Honorable One!
I am but a humble apprentice. I seek to be a
member in good standing in the Weapon Guild. I am not a maker, but a designer of
good and reliable weapons that a warrior can be proud. It would mean great honor
for me to be called a member of the Guild.
IR
Grzzly@aol.com
Excellent !
However, whenever we welcome a new
member into our midst, the honor is definitely ours. Welcome to the Guild. May
your forges burn bright and the light in your eyes never go out. ! I look
forward to seeing and posting your designs to the site.
mupwI' yIuchtaH
!
K'Daq
I have an interest in this Guild you've formed. I'd rank myself as knowledgeable
about edged weapons in general. A rank amateur in methods and skills necessary
to create them though.
Dennis & Kim Orosz Home Pages
http://www.cl-sys.com/dorosz
IKV Hand of Kahless Pages
http://www.cl-sys.com/dorosz/klin.htm
Reshtarc Family Pages
http://www.geocities.com/Area51/6803
Klingon Marine Pages
http://members.tripod.com/~dmorosz/index.htm
KLAW E-Mail list page
http://www.cl-sys.com/dorosz/elist.htm
Excellent !
Knowledge is
power.
The pages of the Guild Site are fairly self explanatory. If you
love weapons (and what Klingon doesn't) then your presence and membership are
welcome. There are no dues and no requirements of participation, although the
Guild grows through the creative input of it's members. I believe everyone has
something to offer .......but I also believe they will know when the time to
share their knowledge will be. Do not hesitate to wade in with letters or
articles, or pictures of work you have done or observed.
Over the past
months I have come to look forward to the energy of the Guild. K'Daq is a very
old Klingon and not long for this battlefield. Sharing the knowledge, teaching
the interested and singing songs with honored warrior friends is making the
battle a glorious victory.
One popular section of the mupwI' has been
the member's history section. If you have developed or are developing a Klingon
family history it would be an honor to display it in the newsletter. You can
review the past examples - they cover a wide range
I look forward to your input........or just the knowledge of
your presence.
mupwI' yIuchtaH!
K'Daq
Master of the *Heart of
Kri'stak*

As the Guild grows, we will try to enhance camaraderie by publishing histories
of our members (both Klingon and Terran). It is not necessary to develop a
family history to be a Guild member, but it does help to solidify an image of
you as a fellow crafts person and Klin.
House Kasara
So many of the guild-members are members of or owe a
great deal to the House Kasara that I felt it fitting to honor it this month.
Especially fitting since it is the first issue of a new year and thoughts of the
friendships that have grown from my fortunate contact and acceptance by the
truly honorable warrior who now leads the House of Kasara - Lady K'Zin epetai
Kasara.
The origins of this family line date back approximately two
centuries ago when it was a predominately Imperial Klingon line. As a Major
Family Line, House Kasara is a forerunner of innovation in the Klingon Empire;
it actively promotes the superiority of females in many fields and encourages
them to achieve highly. As such, there are many highly placed Kasaras in the
Empire who are female; the most famous is the current Head of the Line, Thought
Admiral Kamla epetai Kasara; a strong woman who is loyal to the Empire and
dedicated to the cause of the Grand Alliance. The first female head of House
Kasara, she is also one of the few female Admirals to be found in the Empire.
This but emphasizes her skills in leadership and her power within the
*Komerex*.
Admiral Kamla was recently granted a seat on the Klingon High
Council, partly due to the growing influence of the *Kasara Alliance*; a network
of major Klingon lines allied through consortships, adoptions and friendship
pacts. Currently, the *Kasara Alliance* has connections with the following
family lines: Baclar, Cheghjihtah, De'Hal, Dyzala,Decara, G'Bcyn, Jev, K'Hoska,
K'YaRT'ash, Subaiesh and T'aw.
Also in a notable position is the heiress
to the line, the Lady K'Zin epetai Kasara, eldest daughter to Admiral Kamla.
Lady K'Zin currently holds the influential position as the Klingon Ambassador to
Terra and heads the Klingon Imperial Diplomatic Corps mission located there. She
is presently consorted to the leaders of the Houses Dyzala, Decara, Jev,
K'YaRT'ash and T'aw amongst others, contributing to her high
status.
House Kasara has become a powerful line in the past century for
many reasons, however it is also well known for its two private schools; the
Kasara School of Diplomacy and the Kasara School of Military Arts; and for its
large Kasara Merchant Fleet.
The House of Kasara is presently a
matriarchal line and it is best not to insult or raise the ire of any
high-ranked Kasara female as all have graduated from KaSMA with honours. The
line seeks to embrace the ideals of the Grand Alliance and believes that all
races and species have their own strengths and skills.
House Kasara is an
open, extended family line with a composition of 35% Klingon/Human Fusion, 40%
Imperial Klingon, 20% Klingon/Romulan Fusion and 5% other (Human , Vulcan, etc)
The line is estimated to have between 30,000 to 35,000 members throughout the
Empire with approximately 50+ members (as well as 150+ Kasara Alliance
*relatives*) located on Terra. It welcomes new members, particularly females,
who have intelligence, skill, strength, loyalty and are willing to bring honour
to the line. The Terran liaison is the Heiress to the Line, Ambassador Lady
K'Zin epetai Kasara and she can be reached at the following address:
Klingon@klingon.org
***** I am very happy to have had the opportunity to
present the Kasara history on these pages. Steel knows no gender. I know when my
time comes that the strongest blades at my side will be wielded by females - my
consort, Taant'an is the rock that supports me, Lady K'Zin who has given me the
singular honor of calling her my little sister, is the blood that flows through
my veins and Kaatje who I am honored to call my Great-Granddaughter puts the
fire in my eyes and the strength in my arms.
K'Daq's Law ---Don't EVER
underestimate a warrior because of gender. Lukara (Kahless's future consort)
agreed to be his wife after they together withstood the attack of 500 warriors
at the Great Hall at Qam-Chee. This is considered to be the greatest romance in
Klingon History and it certainly shows that Kahless new the strength of a good
woman at his side.
K'Daq
Next month: The story of may'qel

The history of the 'aqleH or *Half- bat'leth*
The 'aqleth is the
traditional weapon of the Clerics of Boreth . This sect was formed shortly after
Kahless's death. When Kahless pointed to the star that Boreth orbited and
promised that he would return there one day, the clerics traveled to Boreth and
set up a monastery so they could meditate and await his return. The returning
Kahless would be recognized by his ability to recite the ancient origins of the
first bat'leth ( a tale that was kept closely guarded by the clerics to ensure a
valid test of the *returning* hero). In order to separate themselves from the
ordinary warrior and also to honor the memory of Kahless, the clerics cut their
bat'leths in half and mounted them on shafts approximately one and a half meters
long. This design spoke of their ancient origins (pole weapons are ancient) and
their sole purpose in life (to await Kahless's
return).
Qa'Pla!!!
mupwI' yI'uchtaH !!

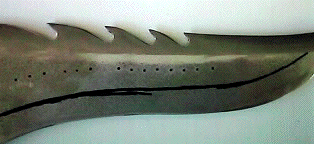
'aqleH or Half-bat'leth
The 'aqleth is one of a very few *pole*
weapons in the Klingon warrior's arsenal. A variety of spears available for use
in battle along with the 'aqleth make up the inventory of shafted weapons. It is
possible that the need for pole weapons was not a common one since they are
primarily a weapon used by ground troops against mounted opponents. There are no
common passages relating to the use of mounts in battle. My own feeling is that
a Klingon would look down upon trampling his enemy with a beast and would
therefore disdain any form of combat that developed from it.
However, the
'aqleth has the advantage of being a very *usable* weapon in its own right.
Although it has half the blade of the standard bat'leth (19.5 inches) it's shaft
gives it a reach of 72 inches which puts it past the bat'leth by 33 inches. So
you have a trade off - sharp edge for reach........an interesting proposition.
When trained properly in its use, a warrior using a 'aqleth is every bit as
lethal as one using a standard blade.
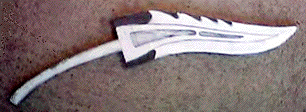
The smaller blade gives you the
option of moving to thinner stock. The 'aqleth featured here is done in 3/16
stainless and is mounted on a 1.5 inch diameter shaft. The blade follows the
exact contours of the standard bat'leth but it has a cutting edge on the spine
instead of blunt areas for grips. This in effect makes the 'aqleth into a form
of axe but it is wielded quite differently. The shaft length is going to be
variable depending on the warrior's build and needs. The shaft in this case is
58 inches long (with the final 8 inches covered with hardened leather to provide
additional gripping ability when needed) and finished with an inch thick
stainless pommel.

'aqleH
Dimensions - average:
thickness of blade -- .1875 inches
length of
blade -- 19.50 inches.
Primary blade tip to
secondary blade tip --
7.00inches
width of weapon -- 15.5 inches
Shaft Material -- 50
inch *Dymondwood* Cylinder
Handle material -- 8 inch X 5/8th inch steel
dowel overlaid with hardened leather
Total length -- 72
inches
weight -- 5 pounds
Next month : ghIntaq - Battle Spear

*Starter* project - Family Warrior's knife or QIS
This month the
tips section continues a step by step construction series for a sheath knife
that the new members can consider making. We will try to identify terminology
that is used in everyday knife making. The project we will be working on is
drawn in it's most complicated form, but by following certain simplifications,
this knife can become a project any novice can complete and be proud
of.
This month the pattern gets cut out (which makes it easier to follow
the design and construction phases) and a variety of decisions points are
reached. We will pause at each point in the construction and give you the good
points and bad points about the many options that present
themselves.
Quarter inch steel is still not available in Houston so I
started the project with a blank of titanium. All of the steps will be the same
except we will not be *hardening* the blade at the end since titanium cannot
harden to our desired levels. I will go over that process just as if we were
using steel when we get to it.
In step one I
have cut the pattern out using only the borders of the main curve of the bevels.
No attempt has been made to cut the *sawteeth* or to reduce the blade thickness
at the guard/handle junction. In order to simplify things, I usually use spray
contact adhesive and glue my pattern directly to the metal. It peals off easily
when finished, and in this case, with all the secondary cuts, it pealed off
during the process itself.
The first decision to be made comes at this
point. In this picture you can see that I have gone with a partial tang. (It
will be shaped and threaded on the end to hold a screw on pommel). You can elect
to make your tang full thickness in which case you follow the design of the
handle's outline, or you can choose any number of tang designs and use the
corresponding handle materials. With the type of tang shown here, you can use a
threaded pommel or completely hide the tang within a solid handle material.
Antelope horns make comfortable, interesting handles and are hollow so this type
of tang fits conveniently within their *walls*.
Next decision is whether
to follow the cuts that bring the base of the blade to a narrower profile. These
are quite easy to do and make the knife itself more graceful. In the following
section we will discuss the *sawteeth* and in that the technique used to make
this profile cut will be covered. I highly recommend that if nothing else, you
make this one addition to your knife.
OK in
this section we address the additional cuts in the knife project. Sawteeth are
an interesting aspect of any knife project if done correctly. If you don't take
your time on them they can ruin an otherwise successful project. TAKE YOUR
TIME.
Choice number three. Do I go with sawteeth or not ? When I see
sawteeth that catch my eye it is because they are uniformly laid out and evenly
ground. Irregularly placed and roughly finished *teeth* belong in a Pakled's
head, NOT on a Klingon's blade.
Good sawteeth are easy to achieve. I
start by drawing the layout and making sure that each tooth reaches the same
depth (or in the case of a curve that it follows a similar curved pathway). With
this knife the teeth become progressively larger but maintain a similar overall
profile - because of this the depth of each tooth as it moves from the tip of
the blade to the guard gets larger. Layout the depth of each tooth and mark it
with a sharpy or any other dark marking pen. Then take a *center-punch* as seen
in the picture and punch each depth marking. This creates an indentation at the
desired point and prevents your drill from *running out*. NOW take a drill that
corresponds to the arc at the base of the tooth and drill at your punch mark.
This creates the lower margin of your tooth and smooths the metal at the same
time. If you are careful, you can greatly reduce the finishing steps by drilling
these holes properly.
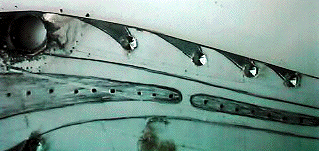
In
this picture you can see each *base hole* started including ones for the guard
area of the blade. Now it is a simple process to follow the lines of the pattern
toward each hole and finish your teeth. Each tooth can be shaped with your belt
grinder at this point but hand files might be safer for a novice. When grinding
metal that has been cut to a point the metal tends to overheat and burn at a
very fast rate ......you could quickly ruin a lot of work with one poor
placement of the blade on the grinder. My suggestion is to work the main bevel
down first with the grinder and then come back to finalize the tooth profile
when it is thinner and easier to work with hand files. **See the next
photo.

In this
picture the teeth have been roughed out and you can make out the start of the
upper main bevel. It is important to place the teeth edges down or away from the
rotation of your grinder when putting this bevel in or they might perforate your
belt and cause it to tear. You are also more likely to have them *catch* and
grab which could tear the blade from your hand. Always approach the grinding
steps with a firm grip in order to maintain control over your work.
Finally note the bevel lines marked directly on the metal. This is the
depth on the profile that I want to carry my grind. It is only a roughly placed
line to give me a reference point.
****Important Note. Before starting
your bevel *grinds*, mark the centerline of your metal..... ie. in quarter inch
you would want a line that runs the entire edge of the grinds marked at one
eighth inch. In other words imagine that you have glued two eight inch sheets of
steel together to make the quarter inch blank. This reference line allows you to
keep your blade edge straight. If you don't mark this reference point you will
probably grind past center in many places and could have a blade that resembles
a Ruffles Chip. I usually color the edge of my steel with a black marker pen and
then take a *scribe* set at the desired edge and drag away the ink at the
centerline. There are a number of commercial scribes sold, but you can easily
make one with blocks of plastic and nails or heavy needles. One of the first
ones I made sat on an elevated block of plastic that I ran along side the work
while it sat on another flat sheet of steel.
These two
pictures show the grinding in of the two primary bevels. I use a large wheel
since I make mostly large blades. This prevents excessive grinding and irregular
bevel surfaces but it is a liability on smaller projects and detail work. When I
have details to work on I use drum sanders *chucked* into a bench mounted
grinder, or I use a variety of files. Patience is a key virtue here.
Grinding Primary
Bevels
In this
final picture you can see the initial placement of both bevels, the roughed out
sawteeth and *punch* marks indicating the central blade *cut-outs* that the
complex project has. I have purposely waited to make the central openings until
after the bevels were ground in in order to center the openings. Whether to make
the cut-outs will be a major decision since they require a good bit of work and
patience. Take the month to decide if your knife needs them or not and we'll
meet back here to discuss it.
Qapla'!

Klingon Battleaxe or 'alngegh
(from Okrand's Klingon for the Galactic Traveler)
Completion of the ghIt (blade) and assembly of the weapon
Well
the holidays were glorious !! I hope all of your projects proceeded as smoothly
as this one did. Thanks to the addition of some new blades for my bandsaw and a
refined understanding of the working characteristics of titanium, the blade for
our 'alngegh has been completed. I will try to relate as much of the process as
I can in the following paragraphs and pictures.
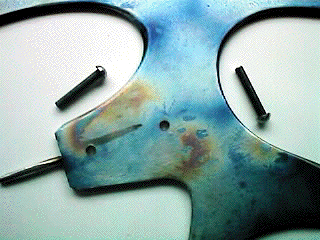
Iridescence/rivet holes and rivets
This first picture
shows the finished blade with the two holes that will secure the blade to the
handle along with the rivets that I will be using. These are dead soft carbon
steel rivets. I believe they are called *water tank* rivets due to their most
common use. They are quite useful in making articulating armor joints and for
joining larger blades to shafts. I have used them on the half-bat'leth and also
to hold the horn handles to the standard bat'leth. To drill holes in titanium
you need to set your drill at it's slowest speed and take your time. If you
allow friction to generate heat the titanium becomes resistant to the cut and
the drill will be ruined. On a slow setting it literally glides through the
metal.
The short partial tang has been rounded to a quarter inch
diameter cylinder and rests in a corresponding hole drilled at the base of the
groove in the handle. Most tangs are made to provide retention, but in this case
all the retention will be achieved from the rivets and this tang helps to
stabilize the blade from any pivoting in the groove. Although the rivets are
paired, an impact of great enough force could rotate and split the handle
without the additional help.
If you examine the picture closely you can
see the iridescence of the titanium that results from heat treating it. You can
control what color the iridescence is by the temperature that you bring the
metal to. The first color change is a bronze/brown shade, that moves to a royal
purple, next a spectacular blue and finally a silver-white. All of the colors
are iridescent and create a very dramatic surface texture.
In the case
of this project (and as you will see in the final picture) the iridescence was
created and then the final bevels were applied to produce an eye catching border
between the cutting edge and the body of the blade.
Finally in this
picture you can see a streak of color extending between the two rivet holes.
This is blood. Its really hard to find virgins to sacrifice these days, so I
used my own blood. Well.......lets face it, if you make knives, you're going to
occasionally get *bit*. I just left it as a reminder. When I made the Sword of
Kahless I got cut and stabbed so many times that I was lucky not to bleed to
death.
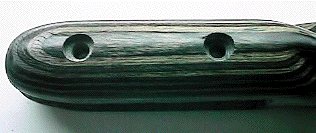
Rivet holes on handle with their *countersinks*
The
next picture is a close up of the attachment end of the handle. The most
important thing in this step is to make sure you bore the holes squarely through
the cylinder of the handle. Do this slowly and against a backing block to
minimize *tear-out*. Tear - out isn't a major concern in this case since I have
countersunk both ends of the rivet hole. The large counter sink holes in this
pic hold the established rivet head. On the back side the countersink isn't as
big. It should be large enough to allow for the expansion of the rivet when it
is *set*.
******VERY IMPORTANT NOTE !!
When peening the end of
the rivet (the act of hammering the rivet end flat) you are actually working and
expanding the steel rivet. This *sets* the rivet in place and secures the blade
to the handle. In cases where you are setting a rivet in other metals there is
no problem with the expansion of the rivet, but in this case you are setting the
rivet through the brittle material of the handle. If you *lay* into the rivet
you might find yourself with a nicely split handle that is good for nothing
(except maybe knocking yourself unconscious out of extreme anger). Take your
time. Make sure you have the rivet head securely placed against a piece of steel
to back it up. I have a slab of half inch steel in which I have ground a variety
of spherical indentions that allow for a number of rivet head sizes. The rivet
slides into the depression and doesn't move while you work. Carefully work the
free end of the rivet starting in the center and working to the outer edges of
it. Center hits will cause the metal to *mushroom* out and the edge hits will
draw the metal down toward your *seat* area.. You will see the steel start to
mushroom out and it will slowly fill the area of your countersink. After this
area is filled a few more taps in the center will draw the rivet tight and
that's it. Check for *wobble* and apply a few more taps until there is none, but
always be careful to control the force of your *taps*.
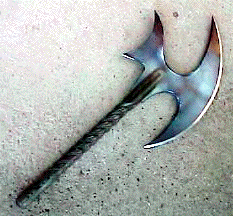
Assembled 'alngegh. Awaiting final *touches*
This is
the final axe assembly. You can see the broad range of iridescence much better
in this view. It has great balance and really gets your heart beating when you
swing it. It could end here - this is fully functional and quite deadly, but
this is where the artist's skill surfaces. Make the axe YOUR creation at this
point. Engrave the handle or the blade, drill a lanyard hole in the handle and
dangle braided cord.......or the hair of your ancestors in it. It is a common
practice to engrave the rivet heads in Klingon weaponry. This stage is where you
go from the ordinary 'alngegh to the 'alngegh vaQqu' !
Come up with your
own ideas over the next month and we'll see how they compare to mine. Send your
thoughts in by e-mail and maybe I'll incorporate them into the final piece.
Remember to write with any material you'd like to have discussed or placed in
*mupwI'* ..
mupwI' yI'uchtaH !!
K'Daq