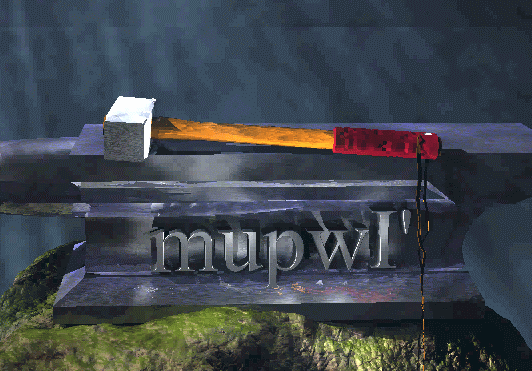
(The Hammer)
The official Transmission of the Klingon Imperial Weapons Guild.
9903.15____________________________________________Vol.3/No.3
Greetings !
I welcome all of you who appreciate the seductive curves and radiant warmth of steel fashioned into the perfect Klingon blade - the betleH vaQqu' !! Whether you are fortunate enough to create your own custom weapons, aspire to learn the art or just want to associate with blade-smiths, *The Guild* is here to serve you and the Empire.
K'Daq son of Toragh
![]()
The next couple of months should bring about a number of changes in the Guild.......mostly in the area of updating posted materials. I know you all have been very patient about the forge listings and the old *links*. Well that should all be cleared up by the next issue of the mupwI'.
I will also be trying to design each article so that the information in them is understandable to Master and novice alike. We need to keep the focus of the Guild on the education of the new weaponsmiths. I think the masters can always benefit from rehashing old topics and even more so if they are the ones writing the articles (hint-hint). At any rate, each article will always have something of interest to even the most *seasoned* craftsman...........I hope. <G>
Keep your fires hot !
K'Daq
![]()
Sheath Construction for the DS9 Daqtagh
Due to circumstances beyond my control, I was unable to get the supplies in to continue this sheath project. I have *dumped* my old supplier and expect to get all my materials in a few more days. So, we'll mark this one up to be finished in our next issue next issue.
**Next month:
We'll add the *hangers* that suspend the sheath from its chain and we'll create custom sterling hardware for the sheath itself.
Japanese/Klingon tajtIq and tanto: The *M'IKiro* project
The same events that delayed the sheath project have seriously impeded this project as well. Although I won't have as many steps completed in this issue, I will try to *set-up* the next steps since they tend to be complicated. We'll be covering a lot of new ground, but if you can master these techniques, you can raise the level of your knife projects.
Early in the history of the Guild we spoke of making *heirloom* type weapons - weapons of such quality and craftsmenship that they would last for many generations. When an artist puts the effort into a blade to make it a lasting symbol of his skill, he/she will generally make an equal effort to adorn the weapon with hardware of similar quality. This is a refelection of the love of the weaponsmith toward the weapon that is being made.
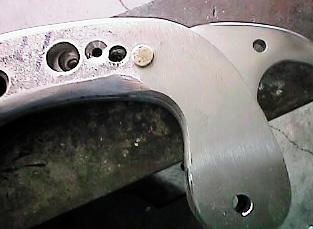
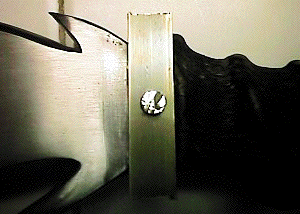
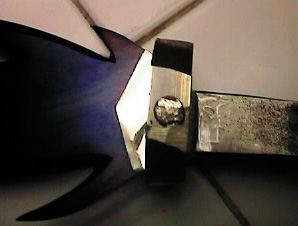
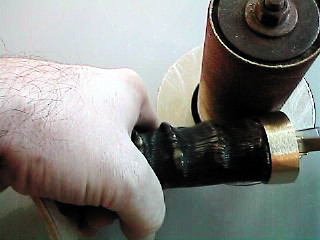
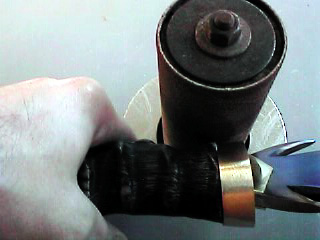
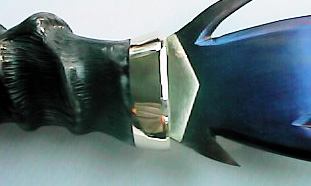
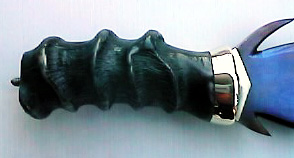
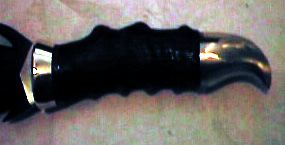
The next step in this project is to fashion a *collar* or *omote* for the handle. These are generally used to strengthen then handle and to protect the edge of the wrapped cord. In most cases the collar is made of a thin sheet of copper or brass which is soldered together to form a ring. The ring slides over the end of the handle and helps contain the force exherted on it.
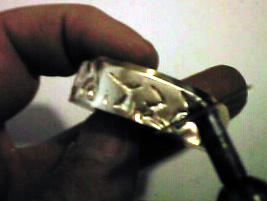
In this case I wanted to do some deep engraving on the collar, so I used a solid bar of brass that I shaped to each handle outline. These were routed out to a depth of 1/8th of an inch to allow for a solid fit.
In this first picture I have both collars shaped and polished to a satin finish. This level of finish allows me to draw lettering or whatever it is I am going to engrave upon the metal. If they had a high shine, the ink would only *bead up* on the metal.
Before I get any further I need to make one thing clear and that is the difference between engraving and *etching*. Etching is a chemical or electronic treatment of the metal that produces a surface change. Engraving is the physical removal of metal forming a *depth* to each symbol. I think that deeper engravings have the *look* and feel of an ancient creation.
I visited the KLI site and used their type face to arrive at the correct lettering. I have chosen *Strong as Blood* to engrave on each collar to reflect a personal saying of mine. I think we all know the importance of *blood friendships* to a Klingon.
I use a dremel tool for small work like this. I have a number of *bits* and grinding wheels that I use in carving. I start out with the largest round bit that will fit in each letter. This allows me to remove a maximum amount of metal with a minimum wearing down of the bit.
The next step is to switch to a smaller round bit that will reach into all the tight corners. I use round bits for these stages because they cut no matter how you hold them against the metal and they leave a nice round trench.
After the initial carving, I go back over the lettering with a snadpaper wheel to clean up each letter's margin so I can see which edges need to be straightened out.
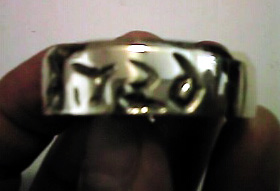
Finally the collar is taken to the large buffing wheel and the high shine is put on the brass. After this each letter is again gone over with a pointed *stone* and that leaves the matte finish in the depth of the letters while having the outer surface in high gloss.
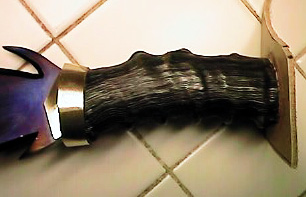
The finished collars are first sprayed with a sealer to protect them against tarnish and then epoxied to the handles. I spray them first because the cord and ray skin would soak up the sealer and discolor.

Using the 1/8th inch routed *seat* as a guide, the collars are epoxied to the handles. These overlap the cord and skin and provide strength to the handle as well as *looks*.
I used the plexiglass patterns as guides to make sure each collar was seated properly and set to the spacing that I'd need when the final brass guards are complete.
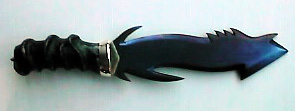
This is just a temporary view of the overall blades. Next time they'll have the real brass guards and some nice brass pommels.
Lost Wax Casting
The guards and pommels of these weapons will be custom made using the *lost wax casting* technique. If you learn the principals of this technique they can be used in all sorts of applications - not just metal.
Basically the process is this:
1. You create a pattern. This pattern can be made out of anything you are comfortable working with. It can even be something already made (you could use a Bird Of Prey model as a pattern and cast it in solid gold<G>).
2. The pattern needs to be converted into wax or some other material that burns away with high heat. Most people use wax since it is readily available and easy to manage, but you can use plastic, or plexiglass, or even organic material (ie bug bodies <G>).
3. You surround this wax pattern with a heat resistant plaster called *investment* and let it harden.
4. You put the *invested* pattern into an oven and *burn* the wax object out which leaves a *void* in the plaster the exact shape of your pattern.
5. You melt metal, and pour it or force it with a centrifuge into the void.
6. The metal hardens and you have the pattern in metal.
Next issue we'll go into greater details on each of these steps when I have the pictures to illustrate with.
For now these are the initial patterns for the guards. This is 1/8th inch plexiglass and I have sketched out a rough idea of what will adorn each guard. In these pics I had thought to put Klingon symbols on the guards, but since then I changed that idea and put the symbols on the collars and will put *Kanji* on the guards instead.
Next issue I will finish making these patterns and take the impression for our wax pattern and all the pictures to help you sort the steps out will be in place.
You can see how this process can be used in other instances. If you're building a large model from scratch, you can make one piece and duplicate it till you run out of plastic......or you can make one pattern for an Order of the betleH and make as many wax patterns as you need.......or you can make a pattern for a Silver Hammer (hint, hint) and cast a bunch of those as well.
Soooooooooooooo:
**Next Month:
All you ever wanted to know about casting brass hardware using the *lost wax* and *centrifugal* casting technique.
![]()
quv'etlh : continued
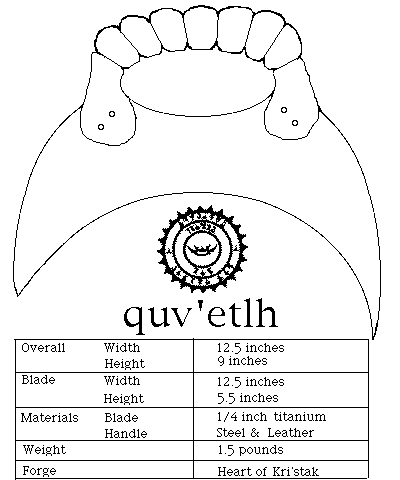
Since this issue deals with the handle of the quv'etlh, I'll *back-track a bit and post some of the pics from last issue.
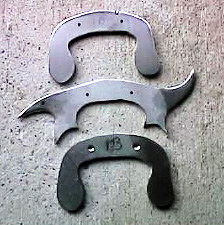
Below are the pieces for two handles with the perimter holes all drilled and waiting for the chisel to cut them out. I am making these handles in three pieces. The outer two pieces of each handle will serve as anchors to the blade and as the outer edge of the grip and the inner piece will fill the gap made by the thickness of the blade and (in this case) allow me to add some features to the weapon itself. It is important that you use the same thickness material on the central piece as you did for the blade or the handle will not *seat* securely.
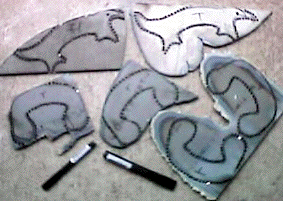
These are the first three pieces chiseled out. You can see the two identical outer halves and the *gutting hook* and *talon* that will be added with the central layer.
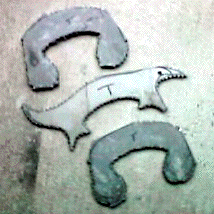
Here are the same three pieces after being ground to the pattern lines and smoothed with *belts*. Note that only a small section of each layer will actually be exposed, so don't waste a lot of time and materials polishing surfaces that will be covered. In fact......in the case of the grip area, a rough surface will provide a better bonding surface for any adhesives you use with the leather wrapping.
This shows the three pieces of both hanldes together for a trial fit. They are being held by ordinary nuts and bolts in this picture so that we can take them apart for polishing.
In this picture I have put the blades into the trial fit to check on the inner clearance for the grip. Any modifications to the shape, design or fit can easily be made as long as the pieces have not been riveted together. So make sure everything fits !
Heres the number one weapon with the handle shaped and polished and the blade seated . After the fit of the blade to handle is checked the blade will be heat treated.
This picture shows the brass rivet being placed on the upper right corner of the grip. A total of four rivets will secure the handle pieces and the blade. Two rivets in the top corners of the handle itslef and two rivets through each *arm* of the handle. You can also see large diamter holes in the handle layers. These are to cut the weight down. They do not reduce the overall strength of the weapon and make it much easier to use. You can also see the hole in the *arm* of the handle that will help secure it to the blade.
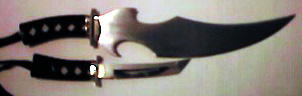
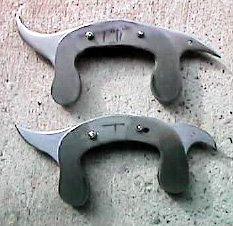
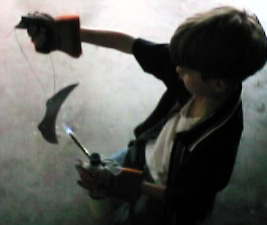
The future master of the Heart of Kri'stak applies some heat to a blade. The number two weapon gets treated by T'Daq. As you can see, he works carefully, he has not set himself on fire, nor chopped any digits off........he must be adopted <G>. I am quite proud of him.
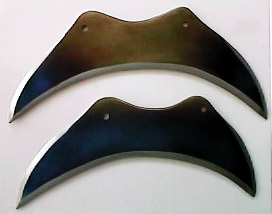
Here are both blades after treating . T'Daq's blade is the lower of the two. He chose to go for the darker blue overall and I tried to keep a god bit of gold color to the central body of the blade. You can also see the two holes where the rivets will secure the handle to blade.
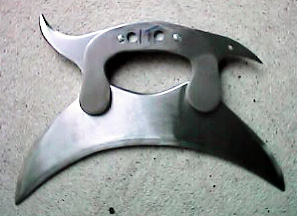
This picture shows the handle riveted to the blade. These rivtes are brass and will show up against the titanium handle, but they accent the gold in the blade and are pleasing to the eye. This also gives you a better view of the holes drilled for weight reduction.
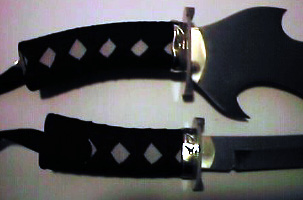
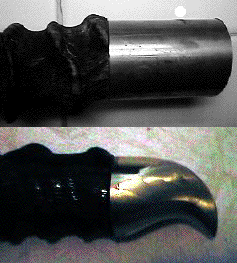
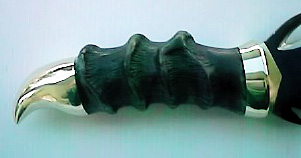
T"Daq's weapon rivted and ready for the leather. As you can see, we varied our *talons* a bit. With the lanyard holes, they look more like the heads of birds of prey. In which case his would be more of a hawk profile and mine would be more of a falcon.
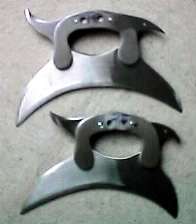
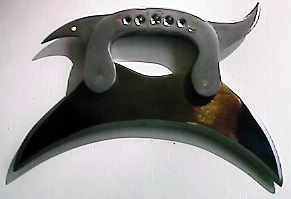
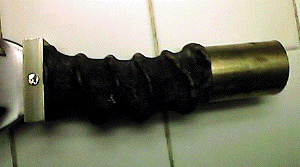
Here is the final *Falcon* quv'etlh with leather wrapped handle in place. With the thicknes supplied by the three layers of titanium in the handle, the leather wrapping is very comfortable to hold.
qutluch *revisited*: continued from last month
In this issue we'll complete the assembly of the qutluch by uniting the blade with some large brass hardware and an antelope horn handle.
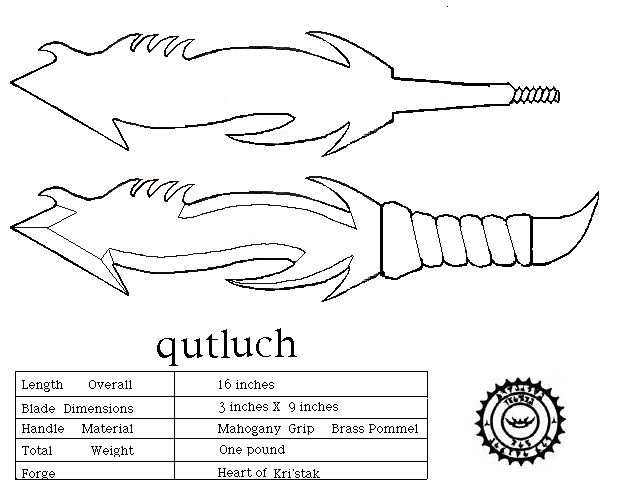
Selecting the materials that you use for your handle should be based on the size and *scope* of the project - ie large powerful blades should be complemented with large powerful handle materials. Large materials would look out of place against a delicate blade. Fortunately as Klingons, we don't have much use for *delicate* blades <G>.
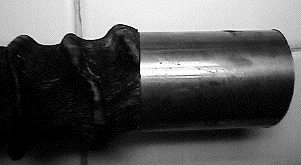
I chose large brass barstock (1/2 inch X 2 inch) and cylinders (1 1/2 inch in diameter) for the guard and pommel. Pictured below is the pommel material during a *test fit* of the horn/pommel junction. The pommel is tapped and threaded in *dead center*, so any adjustments of the handle will have to be made to the way the horn sits and not to the pommel material.
At this stage, I only get a *close* fit, since there are too many variables affecting the way the horn lays on the tang. As we complete later steps, the position of the horn will be solidified and then we can make our permanent adjustments.
Below: As soon as a rough fit is made of the pommel against the horn, I do a trial assembly of the guard - horn - pommel to make sure that no *glaring* problems surface. You can see the guard in its initial state and the pin that will help secure it to the blade itself.
Below is a close-up of the guard/pin assembly. This is a quarter inch brass rod that will be used as a rivet to secure the guard against the *shoulder* of the blade. This helps stabilize the guard and strengthens the handle in general. When the guard is finished the pin - guard border will be almost invisible.
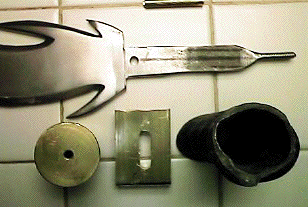
So......here are all the parts after their initial rough fittings. The tang of the blade is now adjusted to receive a hollow handle material (horn) and it has been threaded on the end for the bras pommel. You can see the section of horn and the large opening that will need to be filled at a later step. Finally you can see the brass pin, the guard and the pommel.
In this picture you can see the initial shaping of the guard and youy also see that the face of the guard has been polished. It is advisable to polish this surface before assembly, because it is much easier to get to. Once the blade is placed, there is a shrap angle formed that is very difficult to get polishing devices down into.
This shows the guard placed and the brass pin *peened* down. By *flaring the opening of the pin hole, this *peening* creates a lock from which the pin cannot be freed.
In this picture you can see more rough shaping of the guard to the extent that the pin is now not visible. The final shaping has not been done because we still need to have the horn securely fastened to the tang and butted up against the guard itself. The leather held against the pommel side of the handle is used to create a tight fit against the edge of the horn without causing the horn to tip. For example if I used the pommel to secure the horn in this step, when the pommel *seated* against the horn it would touch one edge first (unless I had gotten really lucky) and this would cause the horn to tip when pressure was applied. The leather will bend and conform to the irregularities of the horn surface and allow for a close fit (to keep the adhesives contained in the body of the horn) and to apply sufficient pressure to keep the horn seated where we want it.
I use *bondo* to serve as the filler material on large hollow horn handles such as this one. The material is very stable and adheres to the tang. Not many materials will adhere to the horn itself, so you usually have to resort to *mechanical* retention. In the case of the horn, it has grooves and valleys inside the hollow interior as well as the overall curve of the horn itself. Bondo can *latch onto these depressions and when the entire horn is filled, the material creates and excellent solid unit. I have used this technique on canes with horn handles and they have easily taken the force of use with no failures.
After the filler sets up, we can see how the pommel *lines* up against the horn with is securely fastened.
In this picture I am continuing to shape the guard to fit the horn profile. It is important to keep the grinding tools away from the horn itself when working on the brass. The horn itself is strong, but it is not that thick and any gouges can cause weak spots and perhaps even *perforations* of the horn. I like to use a vertical spindle sander. It has a variety of spindle sizes and it is perfect for matching the curves of the horn.
Another angle of the guard/horn junction being worked.
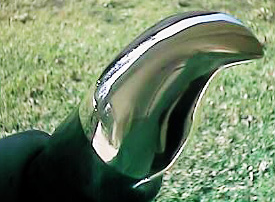
In this picture the guard has been shaped and the final polish has been placed. You can see (or not) that the brass pin is no longer visible. You can also see a *hint* of the variety of colors that make up the typical horn. When polished these colors really show up.
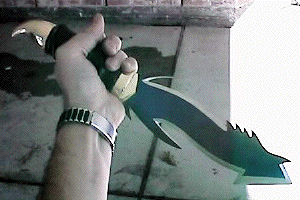
Heres another view of the handle and guard on the blade. I still can't get the sun to shine off the blade like toQDuj can.

This shows the horn in place and the threaded tang protruding from the end. Now that the horn is stabilized, we can do the final fit of the pommel.
An overall view of the same stage.
In this picture the first stages of shaping the pommel have started. I wanted to create a large talon to complement the many *talon-like* sections of the blade. Most of the grinding is done with the pommel off of the tang because a tremendous ammount of heat is built up and it could weaken the bondo/epoxy adhesion to the horn and tang.

This is just another larger view of the pommel at this stage.
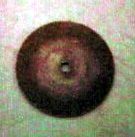
Here is a *before and after* picture of the brass cylinder.
This next *weird* picture is an important one. I use a plastic disc with sandpaper glued to it to help make a perfect fit of pommel to horn. The disc has a hole drilled in the center and I place it over the tang (like a washer) with the sandpaper side against the horn and then screw the pommel down until it just makes contact. Then I twist the disc back and forth against the horn and this sands the horn parallel to the brass pommel. I try to make a rough shaping before I use the disc, but you can use it for the entire step if you'd like. As the horn gets closer to the correct shape the pommel is turned tighter to keep the disc snug against the horn and this is continued until the disc , horn and pommel are tightly down with no gap.
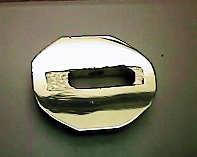
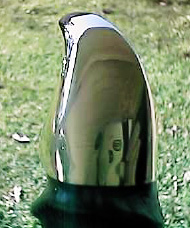
Here is the pommel after final shaping and polishing.
Another view of final shaping and polishing.
An overall view of the final handle.
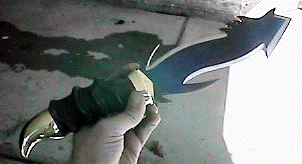
Testing the balance and STILL not getting the sun to shine off the blade !
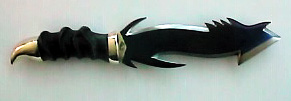
One last view.
The final product with hanlde polished and bevels highlighted. Ready for the collection
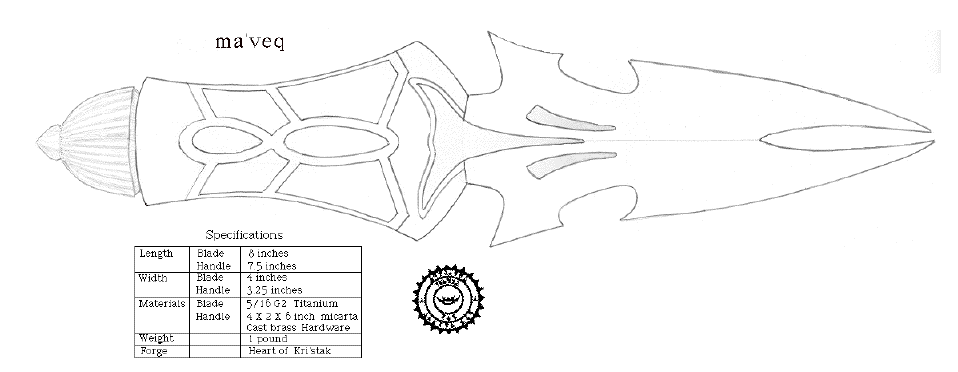
Plan of the Month:
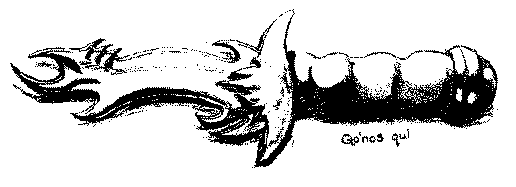
ma'veq

![]()
Work from one of our newest members, Maqta'voq , Master of the *Firebringer* Forge. I like the use of the horn and brass guard. Although he refers to this in the Terran term *Stiletto* I think it easily classifies as a *ghonDoq* which Okrand descibes as a *slender - bladed knife*. He is a new member, but a *seasoned* artist -beautiful work Maqta'voq.
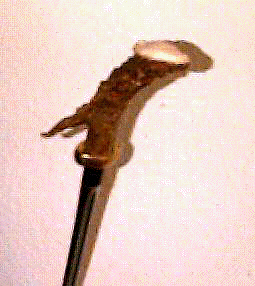
More from Maqta'voq. This meqleH is made of 8 gauge steel with a hollow ground bevel. It is 20 inches in total length. Pay attention to the grip. Although it is wrapped leather, you can see that it is wrapped over a *form* to give the handle a comfortable, sure grip. ......remember that........don't wrap leather over a thin flat tang - its hard on the hand and very hard in combat. Another glorious work !
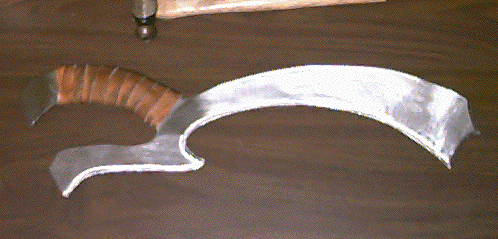
This is toQDuj's latest work in progress. He's doing a trial fit in this pic. The blade is 1/4 inch 440C and thats a Bresbok horn handle. The pommel is a large block of black micarta. Hmmmmmm a nice stainless guard would look great ! <G> You can also see the Sidewinder Forge Symbol at the top of the pic. toQDuj has brought much glory to the Sidewinder and many songs are already being sung for this young warrior/artist.
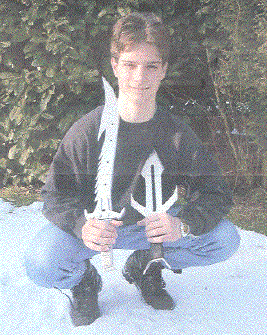
I wanted to post this one again, in case anyone missed it from last month. This is toQDuj himself, displaying the first two blades from the Sidewinder Forge. I believe he is standing in a frozen form of water vapor called snow - something you don't see around Kri'stak.
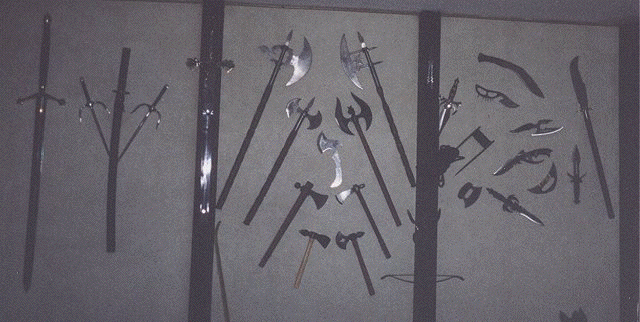
This is the *Wall of Death*, a collection of blades amassed by another new member - Leeland......and you thought YOU had trouble finding a spot for your blades. <G>
Contest Winners
There were several excellent entries in the qutluch contest. They were so creative that I decided to award a few more prizes. I feel like this level of artistry needs to be encouraged, so hopefully having a piece of steel in your hands will help you make it to the next stage.
The winner in the Masters category goes to K'Beck. His design has all the aspects that a talented assassin would look for in a knife. I know K'Beck doesn't need the book, but I bet he can make another masterpiece with a good piece of steel.
K'Beck's Master's entry earns him a piece of 440V stainless. Qapla' !
Next winner is in the *Young Master's* category and it goes to toQDuj. This young artist has really found his *niche* in the Empire. I know they will be singing songs of his great blades for years to come.
toQDuj's young Master's entry earns him a piece of 440V stainless.
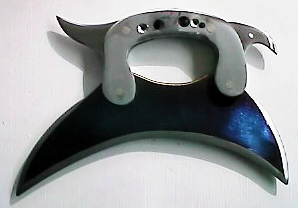
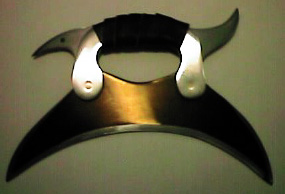
This next winner is from Kordite. In his words it was inspired by the weapons of the South Seas. I think I did see something similar in King Kamehameha's hands once in a movie........or was it the Hula girls I remember? <G>

At any rate. This is definately a unique idea among Klingon weaponry and it sure would do an efficient job. I'd like to see this one *in the flesh* so hopefully the steel and the book that goes with it will prompt Kordite to *make it so*. Qapla'!
The next winning design was submitted by K'toQ. Now we have to call him a novice in the field of weaponry since he hasn't produced a blade yet, but he definately designs on a master's level.
K'toQ's novice entry earns him a piece of 440 stainless and a book - *Step-by-Step Knifemaking* by David Boye. Its time to take a *shot* at this K'toQ! <G> Qapla'!
Next month:
1. Finishing sterling silver hardware and *hangers* on the Daqtagh sheath
2. Creating custom brass hardware for *M'IKiro* project using *lost wax casting* technique.
3. Completion of *M'IKiro* Project
4. Plans for the 'aqleH
5. Starting an 'aqleH project. We'll take you through all the design and construction steps for a Klingon *pole weapon* in this three part article.
6. K'toQ's War Hammer Project. Call me crazy, but we'll see how far we can go in creating K'toQ's winning War Hammer design........this will take several issues of course <G>.
7. Member's Gallery
8. We'll start posting the Klingon War Bow and Klingon Throwing Weapons entries.
9. Contributing artist's articles ?
Questions?
K'Daq <kdaq@kingwoodcable.com>
K'Beck <K-beck.tai.DevnoH@usa.net>