(The Hammer)
The official Transmission of the Klingon Imperial Weapons Guild.
9901.15____________________________________________Vol.3/No.1
Greetings !
I welcome all of you who appreciate the seductive curves and radiant warmth of steel fashioned into the perfect Klingon blade - the betleH vaQqu' !! Whether you are fortunate enough to create your own custom weapons, aspire to learn the art or just want to associate with other blade-smiths, *The Guild* is here to serve you and the Empire.
K'Daq son of Toragh
![]()
What is it that makes a good bladesmith ? Fancy machines ? Exotic material ? Kewl name ? Distinguished bloodline ? Oh hell no !
A good bladesmith is one who is devoted to the art.....one who has a strong heart, a true spirit and a keen imagination. Through devotion you'll transfer that strength of heart into the spine of the blade so it won't break and you'll put that true spirit into the grinds so they'll guide the blade to its target and your imagination will put a keen edge to the weapon so that it never lets it's owner down. A weapon should only be an extension of the warrior. Gowron says "reH nuHmey tu'lu'" - "There are always weapons", but when a warrior has a weapon with the heart and soul of a devoted artist in it, it is as if that artist now fights along side the warrior - and no one knows how to use a weapon better than the smith who made it.
A good bladesmith loves all aspects of making blades, from designing and drawing to forging custom steel. If your situation makes it possible for you to only draw blades, does this make you any less a bladesmith ? NO. You can show every bit of your spirit in a drawing. What about materials ? An artist can infuse his heart into a blade made of wood as well as one made of steel. I've seen more spirit in a short poem about a blade than in some of the commercially *cranked out* blades of steel.
So, whatever material you have chosen to work in - pen and ink to steel and titanium - you are welcome in the Guild as an equal. May your spirit soar over many battles.
Keep your forge hot !
K'Daq
![]()
Throwing Weapons
By Dk'tagh
Greetings fellow warriors, I wish to cover the topic of throwing weapons. I am going to cover many areas so this will be part one of the saga.
Part One
Different throwing Weapons
There are many different kinds of throwing weapons, some of them are listed here and will be discussed in more detail later.
1. knives
2. shuriken ( spike, tsubute and star shaped )
3. darts
4. caltrops
5. bagakays
6. tomahawks and battleaxes ( not your mother-in-law )
7. improvised weapons
Throwing knives
How many of us have seen the movie The Iron Mistress where James Bowie ( Alan Ladd ) hurls his mighty knife at his many enemies, or Desperado where the assasin tries to kill the hero with a group of throwing knives. Yes for many centuries throwing knives have been a part of our lives.
Throwing knives come in many styles from knives that are not really throwing knives but can be used for it to all out professional blades. A knife that you would use for throwing should be fairly balanced ( though really it does not make a difference as we shall see in later sections ). It should have a strong and nearly indestructible handle ( preferrably lexan or leather for you traditionalists ). and should be single edged ( unless you plan to throw by the handle only ). Most professional throwers are only tapered at the point and are not sharpened.
As a rule throwing knives are fairly heavy, about one ounce per inch, so that when they hit they will penetrate well. You can use lighter knives if your ranges are not too far or if you are throwing inside and don't want huge knives bouncing all over.
Shuriken
Whoosh goes the multipointed wheel through the air. For the most part everyone has seen the weapon known as the " ninja star " in books, TV, or the movies. There is much to this weapon such as uses, history and styles. Please forgive me if I am wrong but I have a fairly reliable source on the history of the shuriken. Supposedly shuriken were made from a type of square washer that was used in carpentry to hold beams together on buildings. What was done is the washer was forged and worked on until it had four points on it.
Shuriken have more than one use, actually shuriken have many uses, outside of throwing, such as being used as a fistload, a mini pry bar ( to take out vents in old Japanese castles ) and as great paperweights. As far as throwing goes there are three main types of shuriken ( multipointed, spike and tsubute). Multipointed shuriken are the ones that you are most likely to see in movies and on TV. Their uses in real life were mostly for distractions, sending messages and as a tool. The odds of somebody getting killed with a standard type shuriken are not good unless poison is used.
Spike or bo shuriken are simply a rod about 4-10 inches in length with a good point on one or both ends. Bo shuriken can be thrown mainly in two ways, like a knife flipping through the air or at close ranges, up to about 20 feet, in can be thrown straight to the target.
Tsubute are more rare, they are more like professional skipping stones, made of stone or metal, flat and round, tsubute are used for stunning blows to an opponent. Throwing them at the sword hand or head to incacipate an enemy.
Darts
In China darts were used as weapons, now these darts are not your pub style darts with puny little points, these darts were like dagger blades flying through the air and sometimes they had poison on them. They were harder to use than your standard shuriken, but they are flashy.
Caltrops
Caltrops are not originally throwing weapons, in actuality caltrops were four pointed objects that were designed to always land with one point up. They were spread upon the ground in front of an enemy so that either his horse or himself would get their feet impaled on a point thus rendering the enemy helpless. But they do throw well. The standard way to throw caltrops is by the handful, aiming at your opponent's face.
Bagakays
Bagakays are a Phillipine weapon, they are usually about ten inches long and 1/2 inches in diameter. Bagakays can be either made of wood or steel depending on choice, wooden ones are more traditional, steel ones more modern. They have a point on both ends and are thrown similiar to a knife but usually five at a time.
Tomahawks, Kamas and Battleaxes
Frontier tomahawks and medieval battleaxes can be thrown, some say easier than knives, I feel this to be true. Kamas take a bit more time but throw well also. For those that may not know what a kama is, it is an oriental rice scythe, basically a curved blade set at 90 degrees to a wooden handle. The Okinawins used kamas against the samurai.
Improvised weapons
Just about anything can be used as an improvised weapon for throwing as long as it has some good qualities to it. Things such as coins, rocks, letter openers, lit matches, flour and computers when they act up. More about this later.
This wraps up part one, don't worry I will write more later if K'Daq asks me nice ( put down that taj'tiq K'Daq! )
Dk'tagh
Hey, I thought it was pretty good. Of course we'll expect you to continue in the next issue.....if I'm walking around with a tajtIq, its cuz I don't know what else to do with all this stuff on my desk.
Handles, Handles, Handles
Obviously the handle is a very important part of any knife/sword. The handle must be strong as well as comfortable so that the weapon can be used freely. A poorly constructed handle can make a perfect blade useless.
Any discussion of handles will have to include tangs. The handles available on a project will be determined by the tang style and handle style will restrict the possible tangs for the project. They go hand in hand. There are numerous types of tangs and many times you'll create your own *sub group*. We'll stick to the major categories.
Handles also relate to *guards*....although not in the same direct manner. Some tangs will limit what type of guard (if any) you use while others will not. It is not essential to have a guard on your knife and numerous Klingon swords have no guards at all. We'll stick to the guards that show up in any of the included photos.
Full Tang
The most common type of tang is the *Full Tang*. The full tang merely follows the outline of the knife at the handle. You can actually see the body of the knife along the perimeter of the handle. These are the easiest of the tangs to fit handle material to and they make the strongest knives. The handle material is applied in the form of *slabs* or *scales* which are pinned in place and secured with epoxy. You can rivet some materials , but in most cases the materials used for comfortable handles will split if riveted. There is an item called a *knifemaker's rivet* that is essentially a bolt with a wide cylindrical head and a similarly wide cylindrical *nut*. These both have channels for a flat head screwdriver and by drilling a *stepped* hole you can actually *screw* the rivet into place and provide more hold than just pinning and less stress than the rivet. The excess *head* and nut are ground flush with the handle's surface and look like a larger diameter pin. These are more expensive to use, but are also more forgiving. The *scale* can be bordered by a guard and a pommel or by neither.
Full tang handle assembly is as follows:
1. The guard is placed (if applicable).
2. The scales are fitted to the tang and pin or rivet holes are drilled through scale and tang. If using the threaded pins, you can countersink for the head and nut of the bolt now.
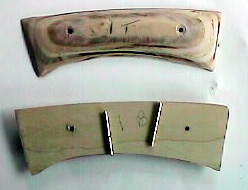
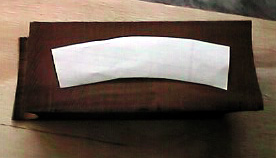
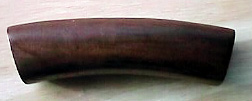
So what are these ? They're the *scales* for a betleH and a Sword of Kahless. Technically these weapons are full tang design. Many examples of them have the leather wrapped directly to the steel, but this creates a sharp angle on the border that will cause the hand to tire after a while. By building up the grip area with a *spacer* such as plywood you can custom shape the grip for a much more comfortable feel. It doesn't take that much longer and it solves many of the problems of how to get the leather to lie down straight.
3. The tang is cleaned of all dirt or grease.
4. Epoxy is mixed, scales placed, pins or rivets are secured and the entire set up is clamped to keep the epoxy layer to a minimum. **Don't squeeze all the epoxy out, but don't get into the habit of using epoxy to make up for a poor fit.
5. After the epxoy has set the handle/guard/pommel is ground to a comfortable shape and polished.
The end results of wrapping over a formed *spacer*.
toQDuj uses full tang design in his Daqtagh - which he has made entirely with hand tools. No motorized fancy machines. It can be done.
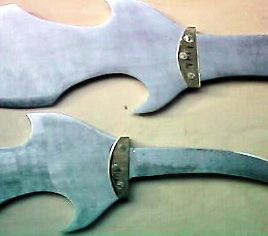
K'Beck's meqleH using full tang design with walnut *scales*.
HovloD with another meqleH using full tang design and standard leather wrap.
An example of the beauty that SuzIlla can add to a weapon through creative handle work.
Half Tang
The half tang is exactly what is sounds like. Its a full tang thats missing the *tail end*. These are usually found in cheap mass produced kitchen utensils.......tools........cheap tools. If you are going to make a knife purely for display and you don't have enough steel to extend the full length of your pattern, then this might be an option. Half tangs don't stand up to the pressure of cutting. You'll have leverage of the tang end against the handle material and eventually that union will fail.
If you opt for a half tang, it will follow the same steps above except you'll need to create a knotch in the lead end of the handle to accomodate for the tang and to allow the rear of the handle material to butt up against itself.
Push Tang
These are the first of the *Hidden Tangs* - tangs that are completely surrounded by their handle material. Push tangs are a short extension of the blade and rely on friction and usually some sort of pin to hold the handle to the tang. They are a lot like the half tang above, in that they create a leverage problem and become loose over time. As before, if you are making a display item, this is still an option. If you are going to carry the weapon, don't select this tang.
Oriental Tang
Oddly enough, the oriental tang is a *push tang*......however.......these craftsmen have taken the drawbacks of the simple push tang and eliminated them. Oriental tangs also rely on friction and a pin for retention, but they extend almost the full length of the handle. There is no leverage problem since the tang still extends well beyond the location of the hand's grip. A final note, the Japanese routinely replaced handles if/when they became loose after use .
This is a tang following typical Oriental designs.
To make an Oriental Tang Handle
1. Either cut your handle's profile from your chosen material or locate a piece of horn, bone etc. to be used.
2. Lay out the center line (length wise) on the handle material.
3. Carefully cut the handle material in half. making sure to keep this cut as straight and as thin as possible. (You'll be gluing it back together at this seem later and thinner straighter cuts will look much better).
4. Lay your tang along the inside of each section and carefully trace it's outline. Remember this needs to be a tight fit.
5. Remove the material from each half that the tang will occupy. Make a lot of test fits and go slowly. The time you take here will determine how well the handle will fit.
6. When satisfied of the fit, carefully glue the two halves back together. Don't use too much glue and don't let it run into the cavity you have carefully carved out or your tang won't fit and you'll have a heck of a time removing the excess.
7. Clamp the halves for security - but not tight enough to distort the internal cavity.
8. After the glue has set, remove clamps and shape handle to your liking.
9. Locate handle to proper location on knife and drill pin hole/s through handle and tang.
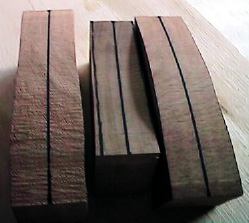
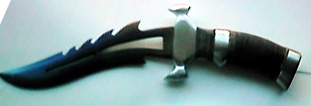
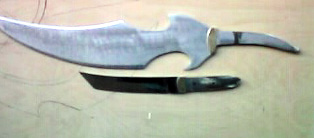
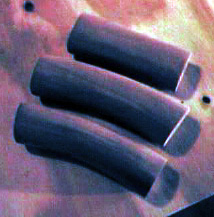
This dagger and sword pair have their handles securely pinned over a tang of Oriental design.
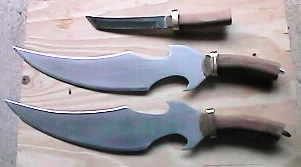
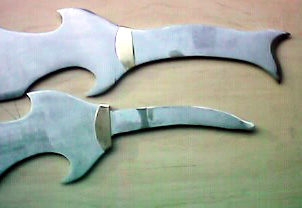
The bottom two blades in this pic are a *hybrid*. The tang is a tapered *Oriental* style and the handles will be finished as such, but they will also have brass pommels. The upper knife - the tanto - is true to the Oriental style.
10. Polish or seal handle material.
If you find that you can't create a tight fitting handle, you can always resort to epoxy to fill the gaps and permanently attach the handle......of course then it will just be a hidden tang knife, but it will serve you well.
Rabbet Tang
The Rabbet tang is more or less an oriental tang except it is assumed that it needs pins and epoxy to remain in place. The construction steps will be the same as the Oriental except that you will plan on placing either pins or rivets to secure your handle material. this type of tang comes in handy if you have a particularly tight curve on a horn or if you have material with a distinctive end that you don't want marred by a pommel. In the case of the *unique* tail end, you can also tap a hole in the handle material and treat the process more like the Rat Tail tang (which is next on the list). This is a good tang for those special cases as the example below will show.
In this case I really wanted to portray the *Dragon's Talon* design that the Water Buffalo created, but there was no way to drill a hole in this complex curve without punching a hole in it. The tang is still 6 inches long and takes the complete force of the blade with no leverage affects.
Rat Tail or Narrow Threaded Tang
This is the most common hidden tang. It allows for the widest variety of handle materials. If you have a nice piece of horn, antler or bone that you want to have as a handle, then this is the tang you'll use. If you like the feel of hardened leather, then this is the tang for you. This tang is essentially a narrow extension of steel from the body of the blade that has a threaded end. The drawbacks to this style of tang are that it is not as strong as a full tang (but still very strong), you need to make a guard and you need to make a pommel - extra work. These tangs generally taper from a small *shoulder* at the blade/tang junction down to the final dimensions of the threaded end. They will vary in shape depending on what you are using as handle material and what type of shape you have planned for the handle (ie, curved/straight handle or coiled horn).
To make a Rat Tail/ Narrow Threaded Tang Handle
1. Fit the guard to the handle (see the dual project later in this issue).
2. Determine if your selected handle material will require you to custom shape the tang. ie A curved piece of horn will require a curved tang. You want your tang to rest in the center of the handle material. An even layer of material will result in a stronger handle. Make the proper alterations to your tang and procede to step 2.
3. Tap a hole through the handle material. If you're using leather washers, this is an easy step - you merely drill or cut an appropriate sized hole in each washer. If you're using a nice piece of burled walnut or a glorious water buffalo horn then you need to carefully place a hole down the center of the material. Obviously a curved horn will end up with a loose fitting opening due to the problems of drilling curved holes <G>. In some cases, you might need to drill in from both ends and meet somewhere in the middle. Remember, that the tang has to be able to slide down this hole and also be very careful not to drill through the horn/wood to the outside (a perforation). this pretty much ruins the nice affect you are trying to achieve. At some point you will switch to hand tools to achieve the passage of your tang through the opening.
4. Once the handle material slides easily up to the guard, you'll need to make minor corrections in the *face* ends of the material - ie. where it butts up to the guard and the pommel. Square these off so that there is no gap.
5. Test fit your pommel and make the same adjustments.
6. At this point it depends on the nature of your handle material. If you have a material that you don't want a lot of heat or possible damage done to, you might want to work that material by itself and remove it while you do as much work on the guard/pommel as possible.
7. Pin or solder your guard to the blade's body.
8. Epoxy the handle to the tang and use the pommel as a clamp by tightening it down in place. Check all the positions of guard/handle/pommel and if OK, let it set up. In the case of leather you epoxy each *washer* of leather down and build them up like a stack of pan cakes until you reach the threaded end. Extend all the way to the tip and let the pommel compress the leather when it is screwed down.
9. Make your minor corrections to the junctions of each part, and polish the piece. In the case of leather, you basically grind your handle to shape at this point.
10. Leather handles have these last two steps. Soak leather in hot lacquer until it can't hold anymore. Let this set up . Depending on the weather, it might take a day or two.
11. Polish leather with 400+ grit belts and buffing compunds.

As you can see this style of handle is my favorite. Most of you will also settle on a favorite style. Let your creative energy decide which method is best for you.
Partial tang
A partial tang is just a ground down full tang that extends through the length of the handle material and on to a pommel.
It is similar to a Rat Tail tang, but it has more steel and is therefore stronger. Because it has more steel, you will be limited in the type of handle materials that you can use - horns and/or bones will need to be heavier etc. The pommel in a partial tang will be attached just as if it was on a full tang ie pinned or riveted
The steps involed in this style handle will essentially be the same as the Rat tail.
This knife has appeared in numerous episodes and is thrown quite a bit. For that reason I opted for a heavier tang (partial) and a decorative pommel. The leather washers allow the tang to be much thicker than with most other materials and that keeps the strength in the range necessary for a throwing knife.
This Daqtagh is strengthened by the use of a partial tang. The tang extends the full length of the knife but is heavier than a Rat Tail tang and is secured by a pinned pommel.
What about weapons with shafts for handles ?
Axes and Hammers
Shafted weapons can be assembled in a variety of ways. There are two commonly used methods to attach axe and hammer heads to shafted handles.
1. Cut a knotch in the shaft and seat the weapon head into that knotch. Secure with rivets.
This method is the easiest of the two in that the primary fitting is done by adjusting the shaft material. The downside to this method is that a certain amount of torque can be generated at the junction of the rivets and shaft and potentially split the shaft. If the knotch is carefully shaped (much like in the oriental tang) then the torque and leverage will be reduced and this will not be a major problem.
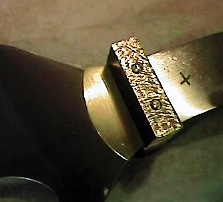
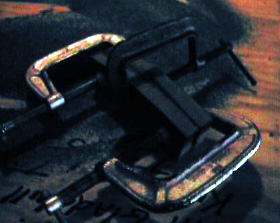
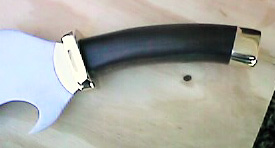
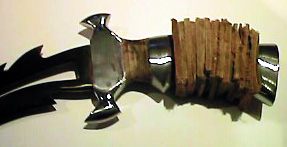
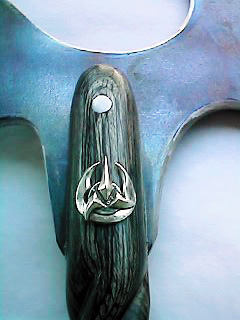
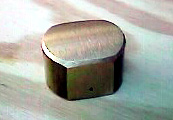
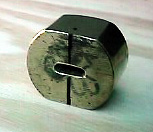
2. The head of the weapon is fashioned with an opening in which the shaft *seats*. The shaft then can be secured with wedges the expand it securely into the opening, or rivets can be placed through the weapon head to secure the shaft. You can also provide additional security with the use of a capping element that supports the shaft such as in K'Beck's war hammer.
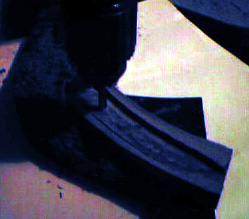
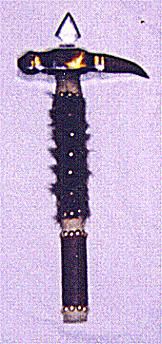
You can see the shaft fitting snuggly in the opening of the hammer head. At this stage it can be *wedged* in place or secured in a more creative manner as seen below.
The spiked head piece not only adds *authority* to the weapon, it serves to secure the shaft to the hammerhead.
![]()
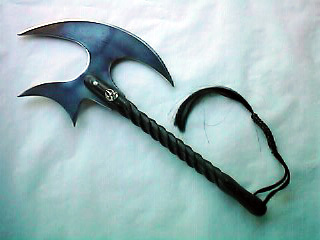
War Hammer - QojmeH mupwI': Conclusion
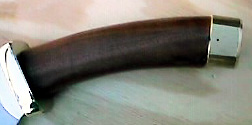
Okay , now that we have had all these interruptions , I can finish up the hammer project ! When I started the handle for the war hammer I was going to make it around 20 inches or so . I also wanted to lighten the head down to around 4 lb , I got it down to 6 . After handling it for a while I decided to shorten the handle to 16" . At 20 1/2" overall , this makes the whole package more manageable .
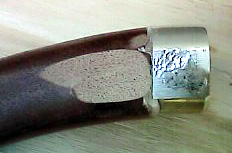
Well anyway , time to get down and dirty . I wrapped the grip in lattigo leather . I used a thin coat of Elmer's glue to help hold everything in place . How many feet do you need to wrap a handle ? None , just two strong hands . The only bad thing about leather is that it stretches , as long as you keep that in mind while your wrapping and keep a constant tension on the cord you shouldn't have any problems . I used brass appolstery tacks to hold the end down when I started . Then I spaced a few all the way around the grip , top and bottom, for looks . The tacks have long , thin posts and bend very easily if you try to just hammer then into a hard wood . I used an ice pick to start the holes before I drove them home . They were tacks when I bought them , but now they are called studs .
Next I got some fake fur and wrapped it around the handle . Be careful to get the ends to match up . I used a metal ruler to insure that I got a strait cut on both sides . I also used a fairly thick coat of Elmer's glue on it as well . Brass tacks to blend it with the grip . Then I coiled two brass wires around the handle and put a tack at each intersection for an added effect . Next time I do the brass wire thing I think I'll either get thicker wire or twist two strands together . Against the fur you can't see the wires . I have seen a special pair of pliers to twist wire , but I haven't found where to buy a pair . I think , if you clamp one end into a vice and clamp the other end into a pair of vice grips then twist until it looks right . As long as you kept steady pressure , it should work .
More as an after thought than anything else , instead of a wedge I made it a stainless steel spike . I ground cannel bevels on the spike . I started to leave a 220 grit finish on everything , then I decided to put a high gloss mat finish , I had to exercise a lot of self discipline not to put a mirror polish on it . Once I get started polishing , and start seeing reflections in the steel , it's hard not to go for that mirrored look . For those who have seen " Insurrection " when that one Lady and Picard get " lost in the moment " That's how I feel when I get in the shop . My wife made me put a clock in there , and she thought seriously about putting a calendar in there too.
Glorious work as usual from the heart of a warrior and artist.
I'd like to hear more of this *Fake* though. Is it a Terran beast or one that you've taken down on an out world ? }};-)
Keep 'em coming my friend,
K'Daq
Dual Teaching Project: Carbon Steel (D2) tajtIq and stainless steel (440C) thrower.
tajtIq
Length : Pommel to point - 24 inches
Width : (at it's widest point) - 4 inches
Material : 3/16 th inch D2 carbon steel
Handle : Mahogany with brass guard and pommel (hidden tang)
Weight : 2 pounds
Aspects to consider in construction:
1. If using a full tang design, shape the tang so that it comfortably fits your hand. Allow for the handle material and create a narrow oval cross-section. Extend the material almost to the pommel area and use the bevels at the rear of the handle to guide your handle grinds smoothly into the handle material.
2. If using a hidden tang, fit a solid , sturdy guard and a similarly sturdy pommel before placing your handle material. Polish the guard on the face that points towards the blade before attaching it to the blade so that you reduce the chance of banging up your finished blade.

Klingon Throwing knife
Length : 10.5 inches
Width : 2 inches
Material : 1/4 inch 440C stainless steel
Handle : None - tang itself (full tang)
Weight : 1 pound
Aspects to consider in construction:
1. Leave the tang oversized until all the grinding and polishing has been done to the blade. You want to make sure you have metal available when you balance the final knife.
2. The handle material should be a solid, sturdy material and should be set back from the perimeter of the tang itself in order to remove the stress of direct impact from the material. You should end up with a rounded or beveled metal edge leading into the handle itself.
Dual Project continued.
Hardening/tempering
This month we continue the dual project. Since we have just recently taken several articles to describe the process of hardening and tempering, I am not going to go into great detail on that. Check back over the recent past issues to answer any questions you might have.
Personally, I use a commercial tempering service when I can (since I can't really see the colors in the metal anymore). They have many options that a *solo* knifemaker can't afford to have...such as vacuum chambers and liquid nitrogen coolant. They also can handle medium-large blades.
One of the most critical aspects of heat treatment is to apply heat uniformly or the steel will warp. It is a truly amazing sight to see such a strong material warp up like a *Ruffles*, but it will. A good treatment oven provides a nice uniform environment - provided your blade will fit in it. The place I use can handle a knife with a total length of 22 inches (which is exactly what the tajtIq is when constructed as a hidden tang/threaded pommel).
Finishing/Polishing
After heating the steel, it could have any number of surface finishes. If you were able to heat it in a good clean environment, it should only be *off-colored*. If you had a lot of contaminants in an open fire when you treated it, it could have *scale* and oxides on the surface. At any rate it will require additional sanding/polishing at this stage.
It is important from here on that you do not overheat the metal. The grit sizes in these stages are going to be small, but they'll build up heat quickly (much more friction). Do a few passes at a time followed by a cooling time. You can even have a water bath available to speed up your work (just dry the blade off before you go back to the belt or compounds, since the water might *gum* them up).
I usually start with the same grit size that I left off with. So if I stopped at a 320, I will continue with that now. I make light passes to see how stubborn the surface is going to be. If it comes off easily, I will move onto the buffing compounds.....if not then I'll work with the 320 for a bit more - ****always keeping an eye for color showing up on the blade (mostly dark blue or brown) especially along the thinner portions (like the bevel's edge). If it even starts to look like toast turning brown, then remove the blade and quench it in the water.
From here on its a matter of how shiny you want your knife. The next belt grit is 400 and that will leave what I consider to be a good final finish for a Klingon weapon....but thats MY opinion. You're opinion is the only one that counts here. There are smaller grit sized belts, but I have never uesed them. I know of artists who use only belts and achieve beautiful finishes...belts are just less forgiving then compunds.
Compunds.
Ok whats a compund ? Imagine taking your sanding belt and stripping the grit off of it and suspending it in a *cake* of *Crisko* and compressing it all together. You'd have a sandy *goo* - that is a polishing compound. Although its not Crisko or anything like it.....its just a non-abrasive binder. You use a bench grinder with a muslin buffing wheel attachment and apply the compound to the wheel. This makes your muslin wheel a sanding wheel.....only the grit is going to be very fine - 300 to 800 grit. The good thing about buffing is that it leaves no belt marks. No matter how careful you are, you will always have belt marks with a belt sander. A muslin wheel leaves no such marks. This in itself is a big improvement in finish. If you are trying to achieve a mirror finish, you will need to have a wheel for each grit or you will be carrying large grit along with small grits as you work up. You'll need a pure grit on the wheel to get a really good finish.
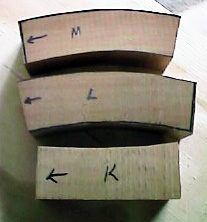
Get all your polishing done and then fabricate some sort of protective device for your hard work and then move along to handle/guard construction. I usually make a cardboard sheath and secure it with masking tape.
Handle and Guard making
For the options available in handles, please refer to the *Handle* article in this issue. We'll stick to the specific types needed here.
The *Thrower* really needs no handle. Throwers rely on a fine balance to perform their designed function and a handle would make it hard to achieve that balance. However, we all like to adorn our creations. As you can see by the pictures, the Thrower has undergone a few changes in design. You need to always be flexible in your projects...especially with new designs. I find that I can draw a design that I really like and when it is first cut out I see places where I'd like to alter the design. Later when it is approaching finish, I might see additional areas to change....in the case of the Thrower, there was also the balance to consider, so changes had to be made to achieve this goal. Initially I wanted to have a Water Buffalo insert that was set back from the handle's perimeter, but the handle became too thin to hold an insert. Then I was going to use brass slabs to accent the handle and these too would have gotten in the way when throwing the blade. Finally, I settled for brass rod inserts to add some color and reflectivity to the handle. I just hate to have a totally monocolored knife.
This is my *first estimate* of how much handle has to go to bring the weapon into balance.
I've marked drill points with a center punch and these will be drilled and chiseled.
Here is the blade with the excess removed and showing a much better balance point.
After shaping and polishing, the knife had an *elusive* feel to it, so I added indentations to allow for a surer grip.
Here is the weapon with the final changes made and ready for the final *vanity* brass addition to the handle.
Well that is probably the easiest handle you'll ever make....lets move to the more difficult ones.
OK........first lets discuss changes on the tajtIq. I guess I just don't like full tang handles. I really like the feel of horn or bone on a handle - especially when its polished. It radiates your body's temperature and its a friendly material to hold (and to shape). So initially these were going to be full tang blades but now they aren't. However, I have the initial steps documented prior to making the change and I'll go over those for your benefit.
The first item to consider is the Guard. You don't have to have a guard. If you observe the Klingon knives on the movies and series they rarely have a guard. They usually just expand the handle where the guard would normally be. Thats ok, but I like the additonal beauty of the guard and it does make a statement - " I'm putting an effort into this work."

Brass bar stock
In full tang knives there are a few ways to fit a guard. In these examples I used one of the easiest. I took 1/2 inch brass bar stock and cut it so that it barely overhung the handle area. Then I tapped two 1/8 th inch holes through the brass - steel - brass and attached the guard with 1/8 th inch brass rod. When this is polished, you won't even see the rods - they'll vanish in the other brass. I also used what I call a *foreguard*. Its a plate of 1/16 th inch brass that I butted up against the guard and also riveted to the blade on both sides with 1/8 th inch brass rods. I wanted to dress the blades up as much as I could. This foreguard gives you an area to engrave, or sign and it also can serve to give your blade a good snug fit in a scabbard. It also protects the steel against scratches when it is drawn from a scabbard. All those benfits might not apply here, but you can use the technique on other projects.

This shows the pins protruding up through the blade and the brass block that will become the guard with matching holes to accept these pins.
The guard block has been placed and the rivets hammered into place. The next step would ordinarily be to shape and polish the guard, but I changed course at this point.
This shows the *foreguards* in place but not yet shaped and polished.
After these are riveted in place, it is only a matter of shaping the brass to conform to the profile of the blade, shaping the guard to a nice curve, and then polishing it. In a full tang handle, the next step would be to fit a flat slab of handle material so that it butted against the guard with no gaps and then cut it to length so that it also butted against the future pommel with no gaps.
However......it was at this point that I decided to make a fanicer handle and I scrapped the full tang.
Actually, K'Beck and M'Ikiro inspired me to make this change. I have never made a Japanese wrapped handle and I thought this was as good a time as any. I viewed this as a fitting challenge for my final knives. It is for this reason that you will now see a traditional Japanese *tanto* included among these project blades. I have been working on it for a long time and it got *sidelined* for the Klingon projects - now it has a purpose and I am very happy that I can get it wrapped up as well.
So now what we have are two tajtIqmey with hidden tangs (much like the original Apocalypse tajtIq) and a traditional *tanto* with a traditional tapered hiden tang of the Japanese smith. The handle construction will start with the fitting of a guard to the blade. In hidden tang blades the guard is fitted by cutting a hole through your guard material (if it is solid) or by routing out similar openings in mirrored halves and riveting them together (if you are *sandwiching* steel for your guard). In this case I've got the 1/2 inch brass and it works well.....however.........another design change <G>. The Japanese have very elaborate guards (tsuba). Since I am attempting to make a Half Japanese - Half Klingon weapon, I wanted to make it as close to that idea as possible, so I will be sculpting and casting the guards for the tanto and one of the tajtIq. The third tajtIq will procede with the stock brass guard.
Cutting the hole is achieved by scribing a line along the midline of the proposed *hole*. You also scribe the outer margins of the tang width at the guard site. Then take a center punch and lay out marks for each drill entry. this is important, since you don't want the drill to *walk* and make your hole too big. Then take a drill that is the same size or smaller than the thickness of the tang - in this case I chose 3/16 th since the steel was 1/4 but had been ground down at that location. Make your entry holes at both outer margins of the layout in order to establish those margins correctly and then drill the other points. With brass, you can use the drill as a router (if you have placed the holes close enough) and shear down the thin wall of metal between each hole. Then use a flat file to clean up the hole and by test fitting the guard to the blade, you can file material from the brass until it fits snuggly to the foreguard. at this point, you can polish both the foreguard and the guard and rivet the guard to the tang (usually just one rivet - too many holes will weaken the tang). You don't have to rivet the guard - the handle should hold it securely - this just helps cut down on some of that *vibration* when the blade contacts it's targets. Its important to polish the guard prior to gluing the handle on since the metal polishing compounds will discolor the wood. Get all your metal steps done first so that you can achieve a good wood finish.
The next step is to choose a very stable wood for the core. The Japanese use a relative of the magnolia tree......I chose to use mahogany. We have many wood workers among our membership and you all know that mahogany is very close/ straight grained. I was fortunate enough to make friends with an exotic wood importer many years ago and he gave me two HUGE slabs of African and South American mahogany (four feet by eigth feet and 5 inches thick!!!). Sadly he died a few years ago and now I can remember him in these projects as well. The beauty of these slabs of mahogany is that they are old growth with very tight grain and should prove to be quite stable in this project.
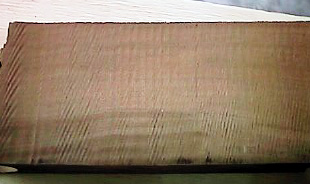
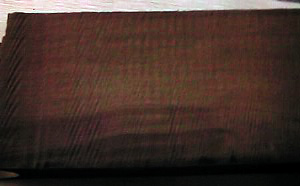
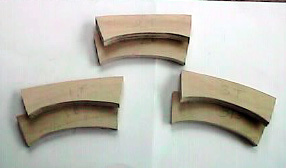
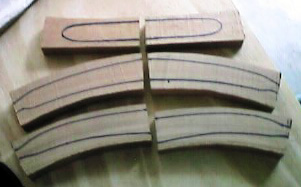
You can see the difference in the two types of wood. The African is a darker wood than the South American, but the grains are almost identical.
Next lay out the profile of your handle on the wood and cut it out. I used a bandsaw.
I use reference marks so that I never get the front and back confused. As you can see, it would be easy to do with these shapes.
At this point, you might be tempted to do some shaping of the handle - DON'T ! You need the handles to remain square and flat sided at this point to make it possible to do the next steps.
Make a reference line down the center of the handle block and carefully cut the block in half (lengthwise). K'Beck showed you how to do this last month. Keep this cut straight and use as thin a blade as possible, since you will be glueing these halves together later.
Now transfer the shape of your tang to the inner portion of the split handle sections (being careful to keep them aligned correctly). As you can see on the upper block for the tanto, the handle will be very traditional, but the tajtIqmey will have pommels attached in a more Klingon fashion. (Afterall these are hybrid knives).
The next step is very critical if you are trying to achieve a true Japanese style handle. The Japanese handle was removable and therefore it had to fit snuggly. The handles on the tajtIqmey will be glued and secured with the pommel, so the fit is not that critical (but you're an artist and you should try to be precise anyway <G>). On the tanto, the traditional method will be followed as closely as possible.
My drill press can be set up to use high speed router bits. This makes quick work on these cut-outs......you can also quickly ruin the cut-outs if you don't maintain tight control of the router. If you don't have a router, then use chisels and carefully remove an appropriate amount of wood. Get the perimeter established and slowly work the depth down. Test the fit frequently until the halves meet and the tang is held securely.
Next I use epoxy and clamps and glue the two halves back together. Be careful not to use too much glue. If you have created a close, tight fit and you let glue overflow into the space you have so carefully chiselled out, then your tang won't fit and you'll have a heck of a time removing the excess glue. Wood chisels much easier than glue.
Now you can shape the handle !. This is where you use your own judgement on how it feels to hold. Be careful not to grind through to the tang ! You are looking for an oval cross-section with possibly a few finger depressions. Carefully flatten each end to allow them to butt against guard and pommel. Use sandpaper with your hand and work all the belt marks and *facets* out of the wood. Leave it with a uniformly smooth surface. This will greatly improve the look when the wood has a finish applied. It is not as important if you are going to procede with the Japanese style handle, but with the other tajtIq we want a good surface.
OK now I have a smooth handle, so I glue it on ?.......right ? Nope. Its much easier to apply your finish to the wood first on this project. Other projects might require some final shaping of the handle to the guard, but this time we have a flat guard that overlaps the handle profile. In order to cut down on the possible contamination of the blade's finish, it makes sense to use your wood chemicals as far away from the steel as possible. This is a good spot to mention wood as a handle material. There are many beautiful woods to choose from, but not all of them make good handle material. Make sure you have the grain running in the same direction as the tang. Any cross grain situations can leave you with an easily cracked handle. If this is a display only piece, then you can use a variety of oils or waxes to bring out the grain and create a spectacular piece. If the weapon is to be handled frequently, the oils of your hand will eventually darken it to a dull matte brown unless you apply a good sealer. I have used lacquer in the past, but it seems to *melt* in adverse temperature conditions. I'm testing out some of the synthetics now. Once you are satisfied with your final handle finish , then you can epoxy it to the tang. The two tajtIqmey will have pinned pommels made from an inch and a half brass rod.
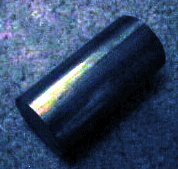
Future pommel for our tajtIq.
You can transfer the outline of the handle to the brass rod and shape and polish your pommel so that it can be pinned after the handle's epoxy has set. If you are uncertain about the shape of the pommel, you can insert another step in here and test fit the pommel before finishing the wood. It is possible that before the epoxy, your handle will might *wobble* a bit and that will make an exact fit impossible at this point. You will need to very carefully grind the final shape to the pommel without marring the wood. (You can do it.)
Guard is polished on both sides and handle is epoxied in place. You can see the tang protruding from the handle where the pommel will be pinned in place.
Large chunk of the brass rod marked and ready to fit in pommel position.
Pommel temporarily set in place. Black dot marks future pin hole location.
Yahhhhhhh, its ugly and the handle gets scuffed, but in a second you won't be able to see any of this. Those are the marks of the hammer on the pommel, placed there when *setting* the pin. The handle has been sanded back to meet the edge of the pommel.
OK......see any marks now ? The brass is worked down just like a blade, then polished and the pin location fades into the body of the pommel. I was using a rub on finish on the handle and it was just a matter of shaping it and the pommel to intersect smoothly and then sanding it all with some fine grit paper. With the rub on finish its easier to control the material and it doesn't mar the brass finish.
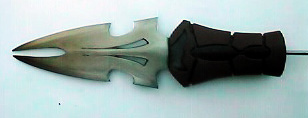
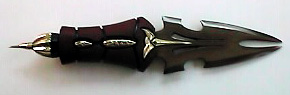
Here is the final product. Ready to take into battle. The other tajtIq and tanto will be the subjects of next month's mupwI' in which we go through all the steps in making a classic Japanes handle with tsuba and a hybrid Japanese/Klingon handle with tsuba and pommel.
We will also be addressing sheath construction as a separate article next month. That way we can present a variety of sheath techniques and more completely cover the topic.
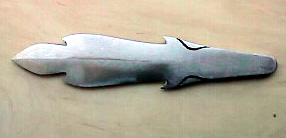
Hand made Daqtagh
As relayed to K'Daq by toQDuj
In a world where everyone is looking for the fastest and easiest way to get things done, it is unusual to find anyone doing it *the hard way*. toQDuj has been with the Guild for some time now and his enthusiasm has done wonders for my outlook on life.
Since his first letter asking for advice on metal selection to his last with the gleaming Daqtagh pictures inside, he has never considered that what he was trying to do was not possible.
I read an article once and in it a very well known knifemaker said that it didn't matter if you had $20,000 worth of machines......if you didn't have the patience and the skills, you'd never get a knife done. I can only imagine the beautiful works of art that toQDuj would produce if he had the machines that some of us have.
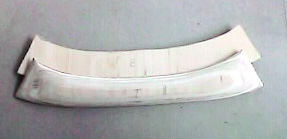
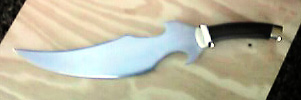
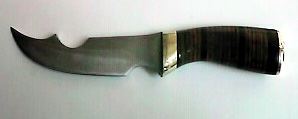
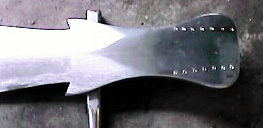
The first picture shows the knife after it has been *roughed* out. In this case it was done with a hack saw and hand files.
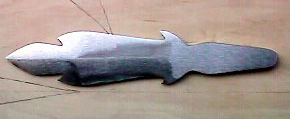
The second photo shows the piece polished prior to placing the handle. There are obviously some changes made to the standard Daqtagh design, but each project dictates how a knife will come together and the creation of a full tang with pommel included in the design ia a practical answer to the difficult task of working by hand alone.

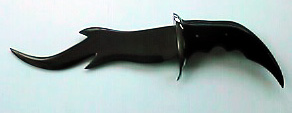
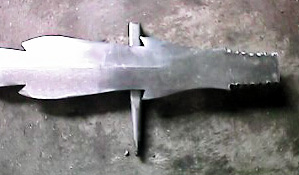
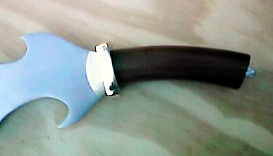
This photo shows the handle in place. toQDuj used an underlying material to build up the body of the handle so that it had a more comfortable profile and then finished it with wrapped leather. The *prongs* on the tail end of the knife are a very creative design feature.
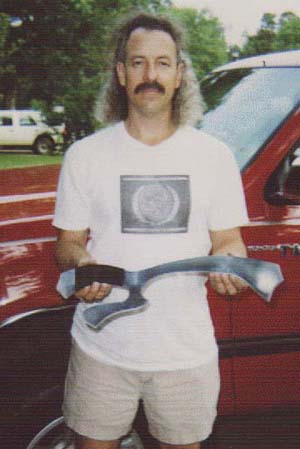
Finally, a proud warrior with his knife. What a glorious setting.
Well done toQDuj.
Weapons Plans
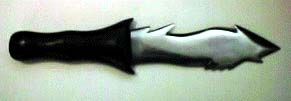
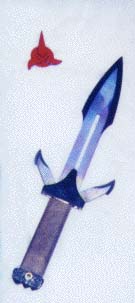
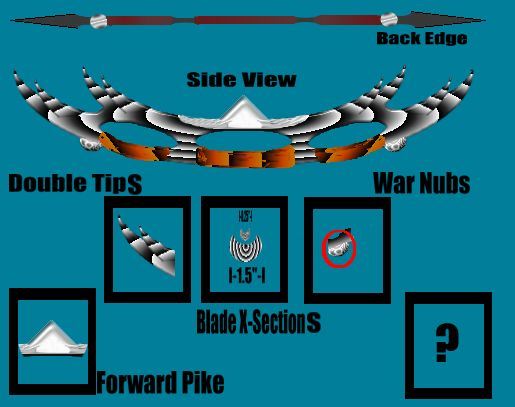
qutluch
This is a modification of the *Next Generation* qutluch. I really like the basic design, but I wanted to make it a bit longer to make the teeth more *active* and to fit in some larger *barbs*. There are also new bevels on the reverse sides of each cutting edge to prevent the blade from becoming trapped in it's target.
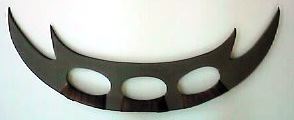
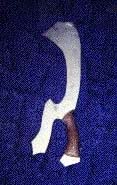
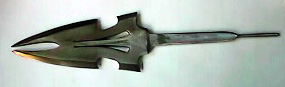
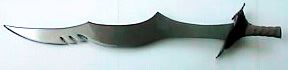
quv'etlh
The quv'etlh is a traditional member of the nuH bey' ,or Klingon Weapons Display, seen in the typical warrior's dwelling. It is a crescent shaped gutting device used with a shield.
Reference: "Star Trek Klingon" CD ROM Game. Opening scenes.
![]()
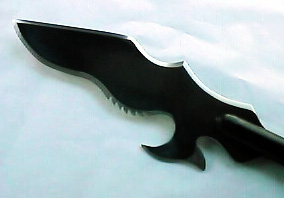
K'Beck's entry in the new *qutluch contest*. I'd hate to have to sharpen this one.
Koloth's jey'naS and symbol of his Forge. majQa' !
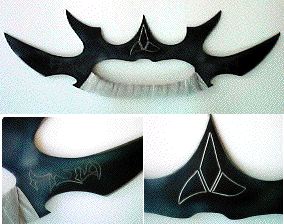
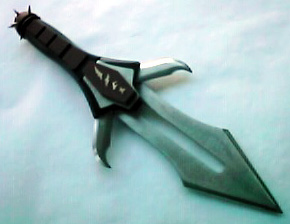
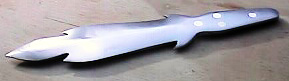
Ric's (no relation to myself) version of the betleH. This is great ! I could imagine this as one of the stages of development from the Sword of Kahless to the present day betleH. If so, they should have stopped at this one cuz its kewl !
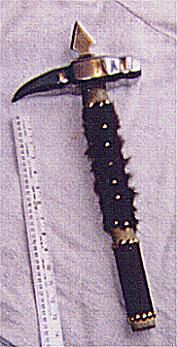
toQDuj's War Hammer......... pretty brutal
Another product from the mind of toQDuj.
The final product...... A totally hand made Daqtagh. Kai ! toQDuj
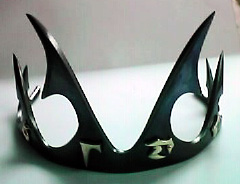
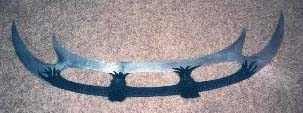
Praxis tiara - by K'Daq.
I was cleaning the old pics out of my digital camera and I came across this. Its not a sword or knife, but it sure has a bunch of blades on it. This is what ya get when ya ask a swordmaker to create a crown.

Finally, for those of you who wonder what it was like on Qo'noS 1500 years ago, here is a family photo of Toragh, just before Molar lost his head.
Winner of the Hammer Contest
The winner of the contest to design a war hammer using the provided *railroad spike hammer* is K'toQ.
As you can see by the design below he not only uses the hammer head to it's full advantage, but he fashions a truly creative weapon as well. I look forward to seeing this hammer when its finished.
Look for this hammer project to appear in a future *mupwI'* as another *dual* project. That should be a lot of fun.
Next Month:
1. Continue Japanese/Klingon tajtIq and tanto.
2. Start quv'etlh
3. Start new qutluch
4. Post the plans for the Sword of Kahless
5. Sheath article
6. toQDuj article on *Creating with "non-powered* tools*
7. Member's Gallery
Questions?
K'Daq <kdaq@kingwoodcable.com>
K'Beck <tlcoy@usa.net>